
Centar za uzbunjivanje u kontrolnom čvorištu
Budite u toku sa svojim Vebek uslugama postavljanjem upozorenja. Pomoću Centra za uzbunjivanje možete pregledati sve važne događaje i ažuriranja na jednom mestu.
Centar za uzbunjivanje u kontrolnom čvorištu je centralno mesto za upravljanje upozorenjima za vašu Vebek raspoređivanje. Administratori mogu konfigurisati upozorenja koja će se isporučivati putem e-pošte, vebhookova, PagerDuti-a ili u prostoru Vebek aplikacije. Bez obzira na konfigurisani kanal isporuke, sva upozorenja će se uvek pojaviti u Control Hub-u.
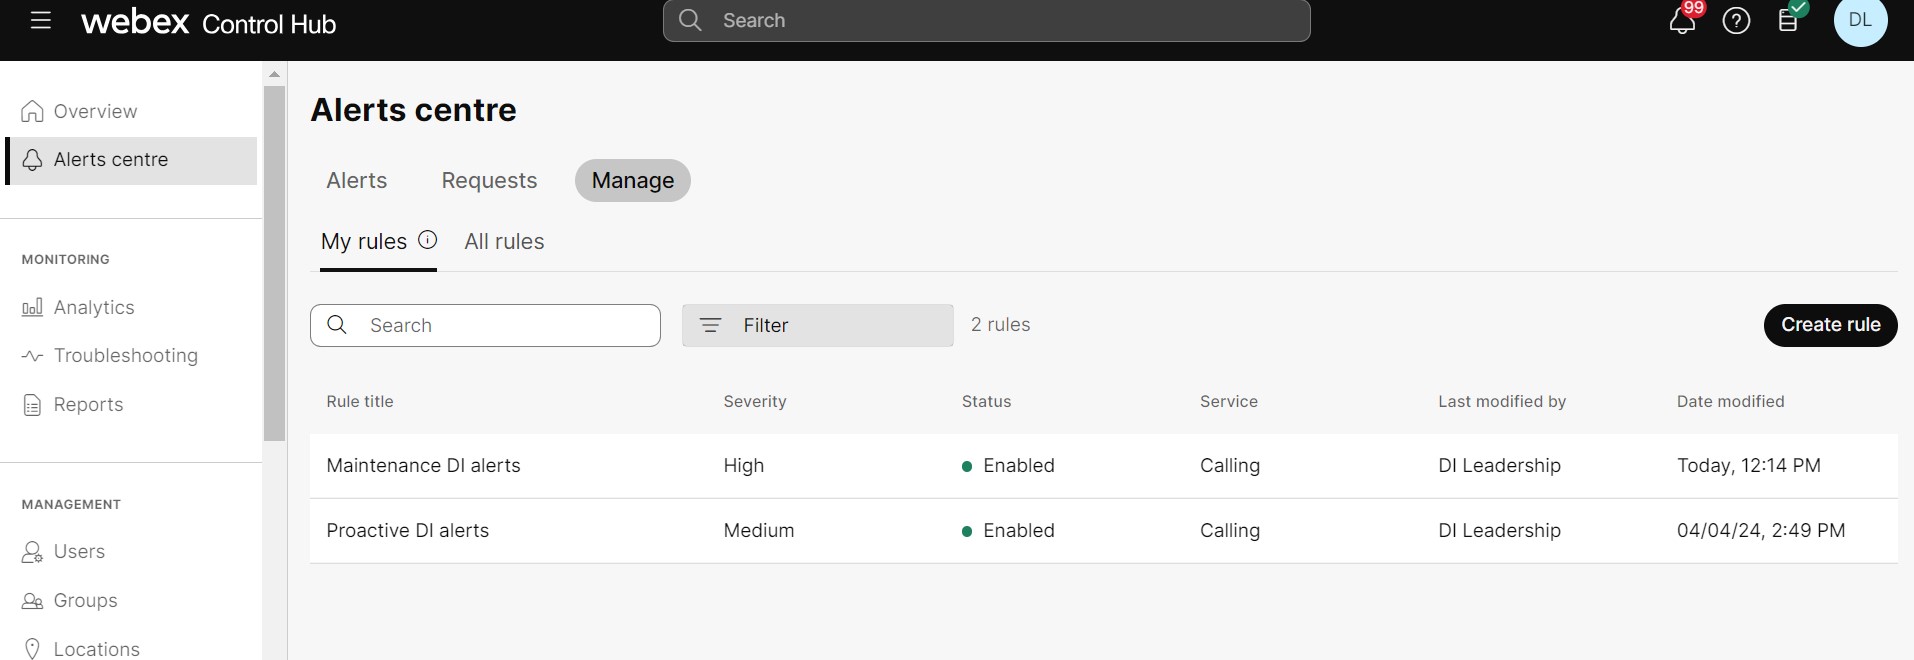
Svaki administrator ima svoj skup upozorenja i pravila koja mogu kreirati i pregledati na karticama Moja upozorenja i Moja pravila , a mogu pregledati sva upozorenja i pravila drugih administratora u organizaciji na karticama Sva upozorenja i Sva pravila . Administratori takođe mogu da pregledaju najave, kao što su ažuriranja softvera iz Cisco-a, u Centru za upozorenja.
Upozorenja za poslednje KSNUMKS dane će se pojaviti u odeljku Upozorenja , možete izvoziti istorijska upozorenja za poslednje KSNUMKS dane u CSV formatu klikom na dugme za izvoz.
Postoje dve kategorije upozorenja: Zasnovan na pragu i generisan servisom.
Upozorenja zasnovana na pragu
Administratori mogu kreirati pravilo za praćenje određenih događaja određivanjem određenih pragova, kao što su učesnici koji dostignu više od 300 ms kašnjenja ili gubitak paketa veći od 8%. Ova upozorenja se aktiviraju samo ako ih administratori konfigurišu kreiranjem pravila.
Administratori mogu dalje konfigurisati način na koji se ova upozorenja isporučuju tako što će izabrati kanal isporuke za njih:
- E-pošta – možete dodati do 30 adresa e-pošte kao primaoce da biste primali upozorenja.
- Vebek aplikacija - Upozorenje možete primiti u novom prostoru, postojećem prostoru ili u prostoru KSNUMKS: KSNUMKS.
Ako se postojeći prostor preimenuje, upozorenje će i dalje biti isporučeno u isti prostor.
- Webhook—Upozorenja će biti isporučena na URL-u webhook-a konfigurisanom u Control Hub-u.
- PagerDuty—Možete da unesete servisni ključ da biste isporučili upozorenja na srodnu uslugu koristeći PagerDuty.
Upozorenja generisana servisom
Ova upozorenja automatski kreiraju Vebek usluge. Većina ovih upozorenja su kritične prirode na koje administrator treba da obrati pažnju. Administratori mogu da upravljaju načinom na koji se ova upozorenja isporučuju tako što će izabrati kanal isporuke za njih sličan upozorenjima zasnovanim na pragu. Kanali isporuke uključuju e-poštu, Vebek App, vebhook i PagerDuti.
Pogledaj upozorenja i pravila
| 1 |
Prijavite se u Control Hub i idite na Alert Center. |
| 2 |
Izaberite jednu od sledećih:
|
Za Vebek sastanke možete kreirati pravila za dobijanje upozorenja za:
- Praćenje sastanaka uživo – koristite ovo upozorenje da biste saznali kada učesnici imaju problema sa kvalitetom medija tokom sastanaka koji su u toku. Možete kreirati do 10 ovih upozorenja.
- Praćenje sastanaka uživo na uređaju – koristite ovo upozorenje da biste saznali kada uređaji imaju problema sa kvalitetom medija tokom sastanaka koji su u toku. Možete kreirati do 25 ovih upozorenja.
- Istorijski trend kvaliteta sastanka - Koristite ovo upozorenje da biste saznali kada procenat učesnika na određenim vebek lokacijama i lokacijama dostigne pragove kvaliteta medija koji se automatski postavljaju na osnovu prošlih performansi sastanaka u poslednjih sedam dana. Možete kreirati do 10 ovih upozorenja.
- Istorijsko nadgledanje kvaliteta sastanka - Slično upozorenju o trendu kvaliteta istorijskog sastanka, možete koristiti ovo upozorenje da biste postavili sopstvene pragove kada ćete primiti upozorenje kada procenat učesnika na određenim Vebek lokacijama i lokacijama dostigne bilo koji prag kvaliteta medija. Možete kreirati do 10 ovih upozorenja.
Upozorenja o sastancima pokreću se samo za učesnike koji prisustvuju sastancima putem Vebek sastanaka i Vebek aplikacije. Minimalne verzije aplikacija koje učesnici moraju da koriste za pokretanje upozorenja su:
-
Vebek sastanci desktop aplikacija verzija KSNUMKS ili novija
-
Mobilna aplikacija Vebek Meetings za Android i iOS verziju KSNUMKS ili noviju
-
Vebek App desktop verzija 3.0.12427.0 ili novija
-
Vebek App mobilni Android verzija 4.1.6 ili novija
-
Vebek App mobilni iOS verzija KSNUMKS ili novija
Upozorenja se ne pokreću za sastanke samo za zvuk, Vebek događaje i Vebek treninge.
Možete omogućiti do KSNUMKS upozorenja o praćenju sastanaka uživo po organizaciji. Svako upozorenje može pratiti do 30 korisničkih adresa e-pošte ili 30 uređaja.
Ako je označeno polje za potvrdu Nadgledajte sve učesnike , upozorenje se aktivira samo za sastanke sa manje od 50 učesnika.
| 1 |
Prijavite se na Control Hub i idite na . |
| 2 |
Kliknite na dugme Kreiraj pravilo. |
| 3 |
Izaberite Praćenje sastanaka uživo pored Tip, i unesite ime za upozorenje pored Naslov. |
| 4 |
Uključite prekidač Status da biste primali obaveštenja o upozorenju. |
| 5 |
Izaberite korisničku e-poštu ili naziv uređaja i unesite do 30 korisničkih adresa e-pošte ili uređaja. |
| 6 |
Označite polje za potvrdu Nadgledajte sve učesnike da biste primali upozorenja za sve učesnike koji su na istim sastancima kao i korisnici ili uređaji na listi. |
| 7 |
U odeljku Pravila podesite sledeće pragove:
|
| 8 |
Podesite akumulirano i uzastopno trajanje za upozorenje da se aktivira. |
| 9 |
U odeljku Kanal isporuke označite polje za potvrdu E-pošta i unesite adrese e-pošte ko će primati upozorenja. |
| 10 |
Označite polje za potvrdu Vebek prostora i unesite ime prostora ako želite da primate poruke u tom prostoru kad god se dostigne prag. |
| 11 |
Kliknite na Sačuvaj. |
Možete omogućiti do KSNUMKS upozorenja o praćenju sastanaka uživo po organizaciji.
| 1 |
Prijavite se na Control Hub i idite na . |
| 2 |
Kliknite na dugme Kreiraj pravilo. |
| 3 |
Izaberite Nadgledanje sastanka uživo uređaja pored Tip, i unesite ime za upozorenje pored Naslov. |
| 4 |
Uključite prekidač Omogućeno da biste primali obaveštenja za upozorenje. |
| 5 |
Izaberite za praćenje:
|
| 6 |
U odeljku Pravila podesite sledeće audio i video pragove:
|
| 7 |
Podesite akumulirano i uzastopno trajanje za upozorenje da se aktivira. |
| 8 |
U odeljku Kanal isporuke možete:
|
| 9 |
Kliknite na Sačuvaj. |
Možete dodati do 10 istorijskih upozorenja o trendovima kvaliteta sastanaka po organizaciji.
| 1 |
Prijavite se na Control Hub i idite na . |
| 2 |
Kliknite na dugme Kreiraj pravilo. |
| 3 |
Izaberite Istorijski trend kvaliteta sastanka pored Tip, i unesite ime za upozorenje pored Naslov. |
| 4 |
Uključite prekidač Status da biste primali obaveštenja o upozorenju. |
| 5 |
Izaberite koji Veeks sajt i lokacije učesnika za primanje upozorenja. |
| 6 |
U odeljku Kanal isporuke označite polje za potvrdu E-pošta i unesite adrese e-pošte ko će primati upozorenja. |
| 7 |
Označite polje za potvrdu Vebek prostora i unesite ime prostora ako želite da primate poruke u tom prostoru kad god se dostigne prag. |
| 8 |
Kliknite na Sačuvaj. |
Možete omogućiti do 10 istorijskih upozorenja o praćenju kvaliteta sastanka po organizaciji.
| 1 |
Prijavite se na Control Hub i idite na . |
| 2 |
Kliknite na dugme Kreiraj pravilo. |
| 3 |
Izaberite Praćenje kvaliteta istorijskog sastanka pored Tip, i unesite ime za upozorenje pored Naslov. |
| 4 |
Uključite prekidač Status da biste primali obaveštenja o upozorenju. |
| 5 |
Izaberite koji Veeks sajt i lokacije učesnika za primanje upozorenja. |
| 6 |
U odeljku Pravila podesite sledeće pragove:
|
| 7 |
U odeljku Trigger izaberite trajanje za nadgledanje i unesite procenat učesnika koji moraju dostići jedan od pragova da bi pokrenuli upozorenje. |
| 8 |
U odeljku Kanal isporuke označite polje za potvrdu E-pošta i unesite adrese e-pošte ko će primati upozorenja. |
| 9 |
Označite polje za potvrdu Vebek prostora i unesite ime prostora ako želite da primate poruke u tom prostoru kad god se dostigne prag. |
| 10 |
Kliknite na Sačuvaj. |
Za Vebek pozive možete konfigurisati sledeća upozorenja:
Dodajte upozorenje o kvalitetu poziva
Koristite ovo upozorenje da biste saznali kada kvalitet poziva na određenim lokacijama ili medijska sesija korisnika padne na loš kvalitet.
Kvalitet poziva se obračunava kao:
- Dobro - I video i audio stream imali su podrhtavanje ispod 150 ms, kašnjenje ispod 400 ms i gubitak paketa ispod 5%.
- Loš - I video i audio stream imali su podrhtavanje iznad 150 ms, kašnjenje iznad 400 ms i gubitak paketa iznad 5%.
Upozorenja se šalju kada se poziv završi. Kada primite upozorenje, možete kliknuti na Rešavanje problema sa pozivom da vas odvede direktno na poziv u rešavanju problema ako upozorenje prati određene korisnike. Ako upozorenje nadgleda lokacije, možete kliknuti na Pogledaj analitiku da biste se odveli na karticu Kvalitet medija u Pozivanje analitike.
Možete kreirati do 10 upozorenja o kvalitetu poziva po organizaciji.
Upozorenja se ne pokreću na deblima zasnovanim na namenskoj instanci (DI).
| 1 |
Prijavite se na Control Hub. |
| 2 |
Idi na . |
| 3 |
Kliknite na dugme Kreiraj pravilo. |
| 4 |
Iz padajuće liste Servis izaberite Pozivanje. 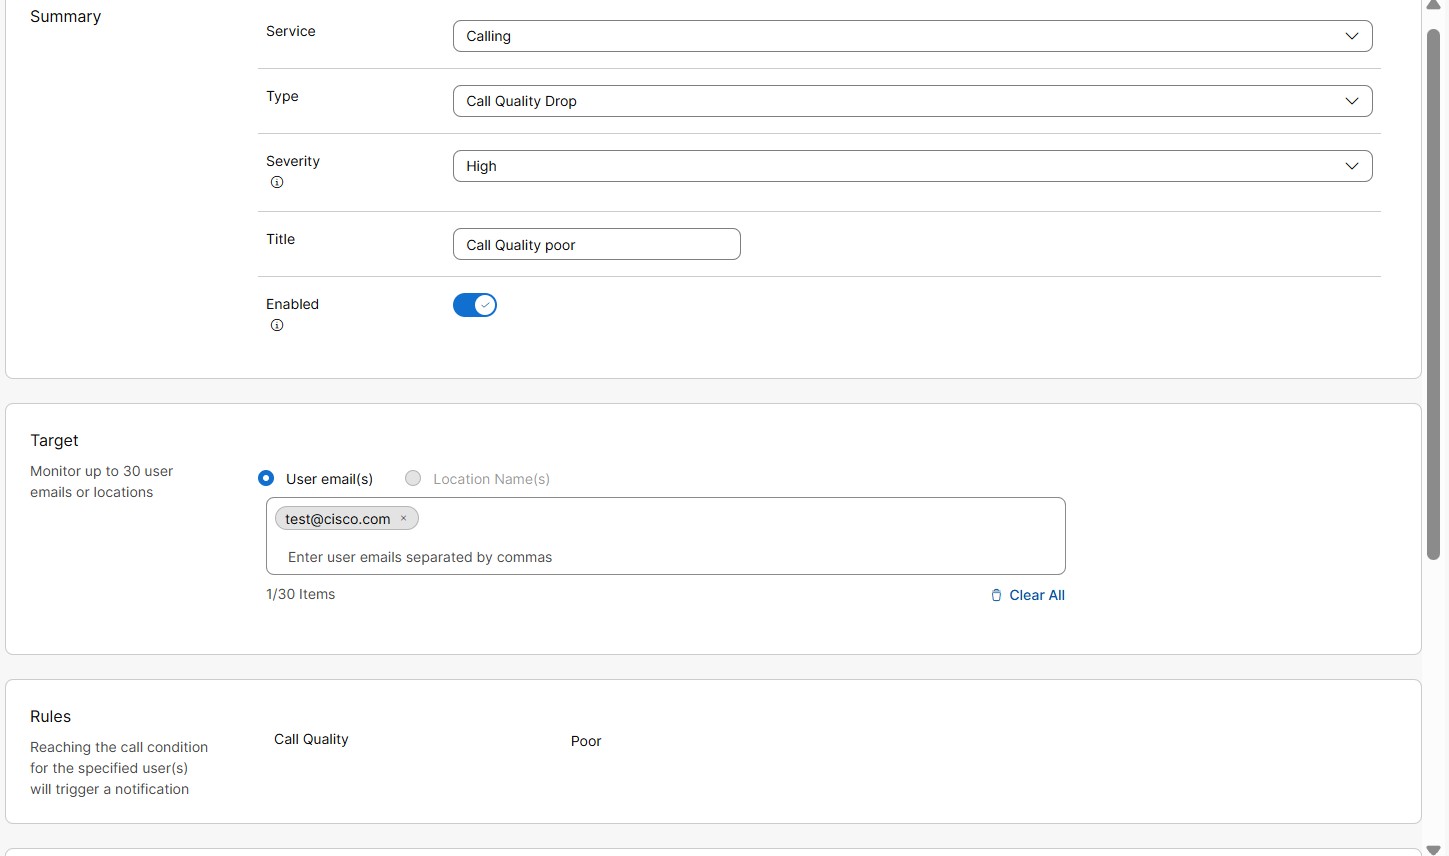 |
| 5 |
Iz padajuće liste tipa , izaberite Call Quality Drop. |
| 6 |
Iz padajuće liste Ozbiljnost . Ovo polje pokazuje koliko je ozbiljno ili važno upozorenje. Možete odabrati nivo ozbiljnosti kao visok, srednji ili nizak.
|
| 7 |
Unesite naslov. |
| 8 |
Uključite Omogućeno da primate obaveštenja za upozorenje. |
| 9 |
U odeljku Target izaberite Korisnička e-pošta ili Ime lokacije. Možete da unesete do 30 korisničkih adresa e-pošte ili lokacija za praćenje.
|
| 10 |
U odeljku Kanal isporuke izaberite kako da primate upozorenja: 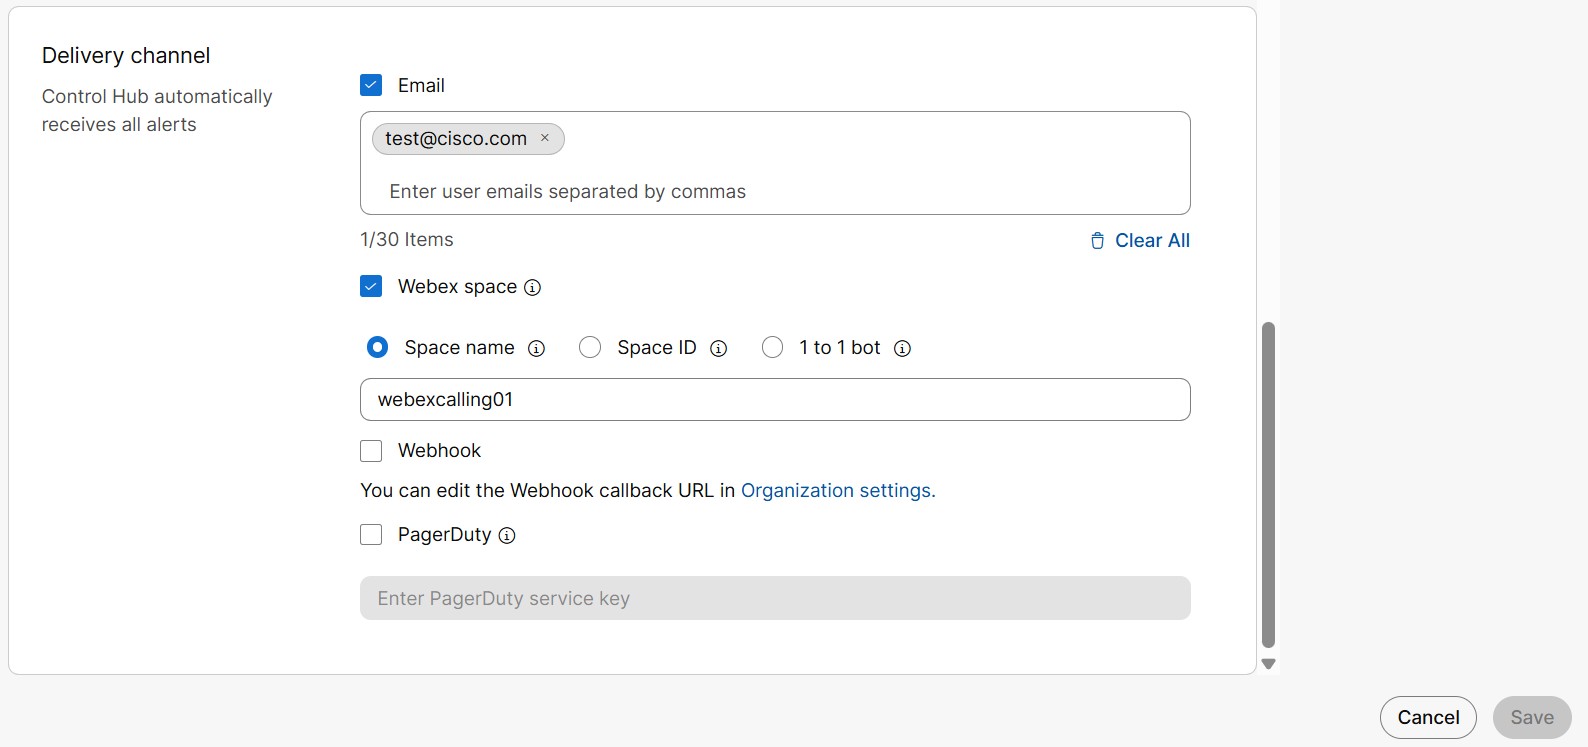
|
| 11 |
Kliknite na Sačuvaj. |
Dodajte upozorenje o promeni statusa prtljažnika
Upozorenje se šalje kada se status posmatranog prtljažnika promeni. Dostupni statusi prtljažnika su na mreži, van mreže i oštećeni. Možete konfigurisati koja promena statusa treba da pokrene upozorenje.
Slede različiti status prtljažnika:
-
Online - Uspešna registracija lokalnog gatevai-a za Vebek pozive.
-
Van mreže - Neuspešna registracija lokalnog gatevai-a za Vebek pozive.
-
Oštećeno - Neuspešna veza između najmanje jednog Vebek Calling Edge proksi i lokalnog gatevai-a.
-
Nepoznato - U procesu uspostavljanja veze između Webex Calling-a i lokalnog gatevai-a koji je nedavno dodan.
Da biste saznali više o različitim promenama grešaka u statusu, pogledajte članak centra za pomoć Odeljak za rešavanje problema sa lokalnim gatevai-om.
| 1 |
Prijavite se na Control Hub. |
| 2 |
Idite na . |
| 3 |
Kliknite na dugme Kreiraj pravilo. |
| 4 |
Iz padajuće liste Servis izaberite Pozivanje. 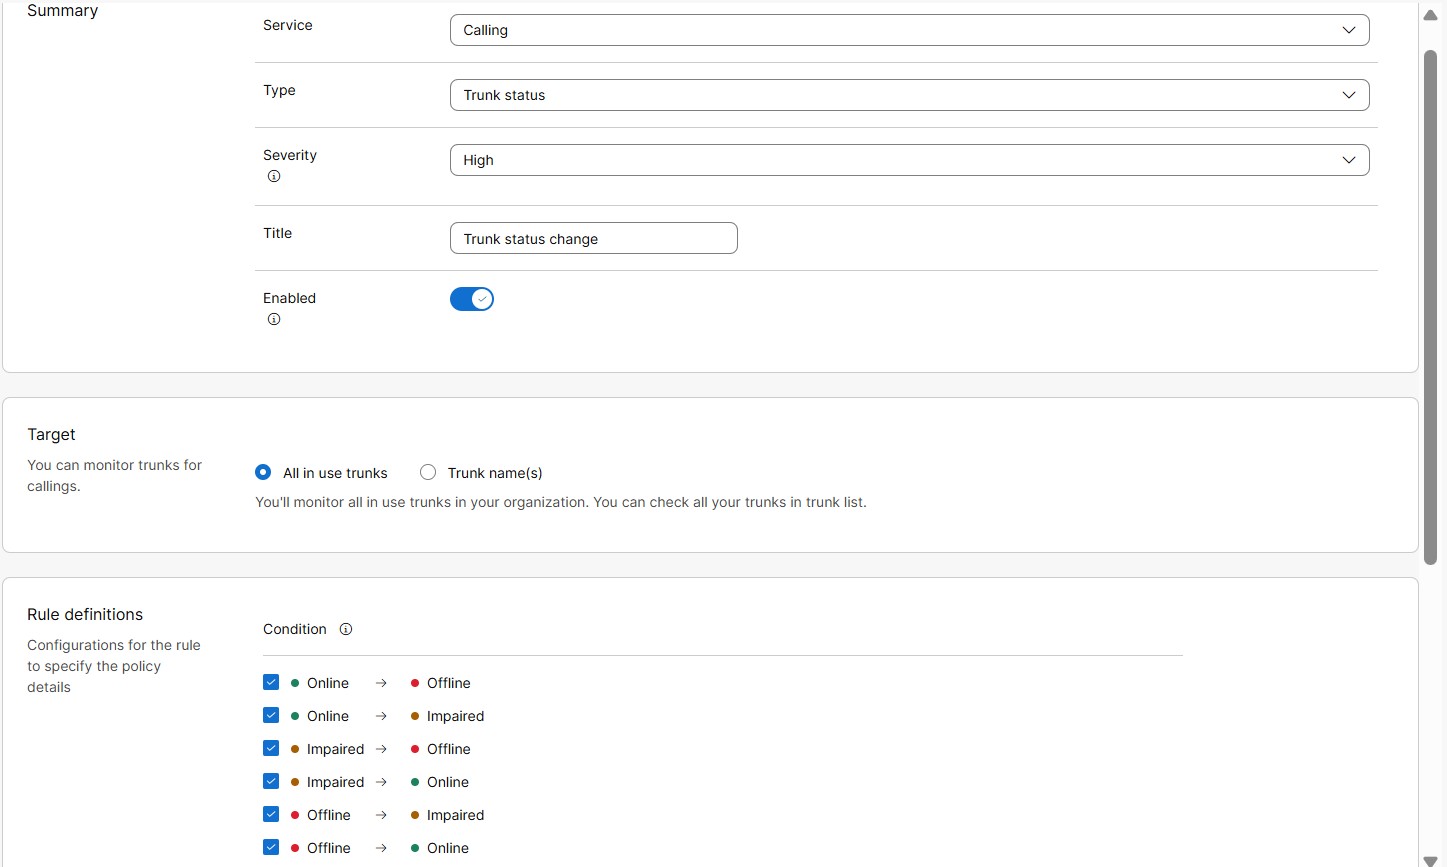 |
| 5 |
Iz padajuće liste Tip izaberite Status prtljažnika. |
| 6 |
Iz padajuće liste Ozbiljnost . Ovo polje pokazuje koliko je ozbiljno ili važno upozorenje. Možete odabrati nivo ozbiljnosti kao visok, srednji ili nizak.
|
| 7 |
Unesite naslov. |
| 8 |
Toggle on Omogućeno da primate obaveštenja za upozorenje |
| 9 |
U odeljku Target izaberite Trunk name(s). Možete da unesete do 30 debla za praćenje.
Upozorenja se ne pokreću na deblima zasnovanim na namenskoj instanci (DI). |
| 10 |
U odeljku Definicija pravila, možete definisati pravilo kada upozorenje treba da se pokrene. Možete da izaberete sve ili izaberete neku od sledećih promena statusa:
|
| 11 |
U odeljku Kanal isporuke izaberite kako da primate upozorenja:
|
| 12 |
Kliknite na Sačuvaj. |
Dodajte prtljažnik istovremeni poziv limit upozorenje
Upozorenje se šalje kada se dostigne granica praga istovremenih poziva na prtljažniku. Ovo upozorenje pomaže da se identifikuje zauzet sat ili dan kada se dostigne kapacitet prtljažnika za rukovanje istovremene pozive.
Uzastopna upozorenja se aktiviraju u izabranom vremenskom intervalu, ako konfigurisani prag nastavi da krši.
| 1 |
Prijavite se na Control Hub. |
| 2 |
Idite na . |
| 3 |
Kliknite na dugme Kreiraj pravilo. |
| 4 |
Iz padajuće liste Servis izaberite Pozivanje. 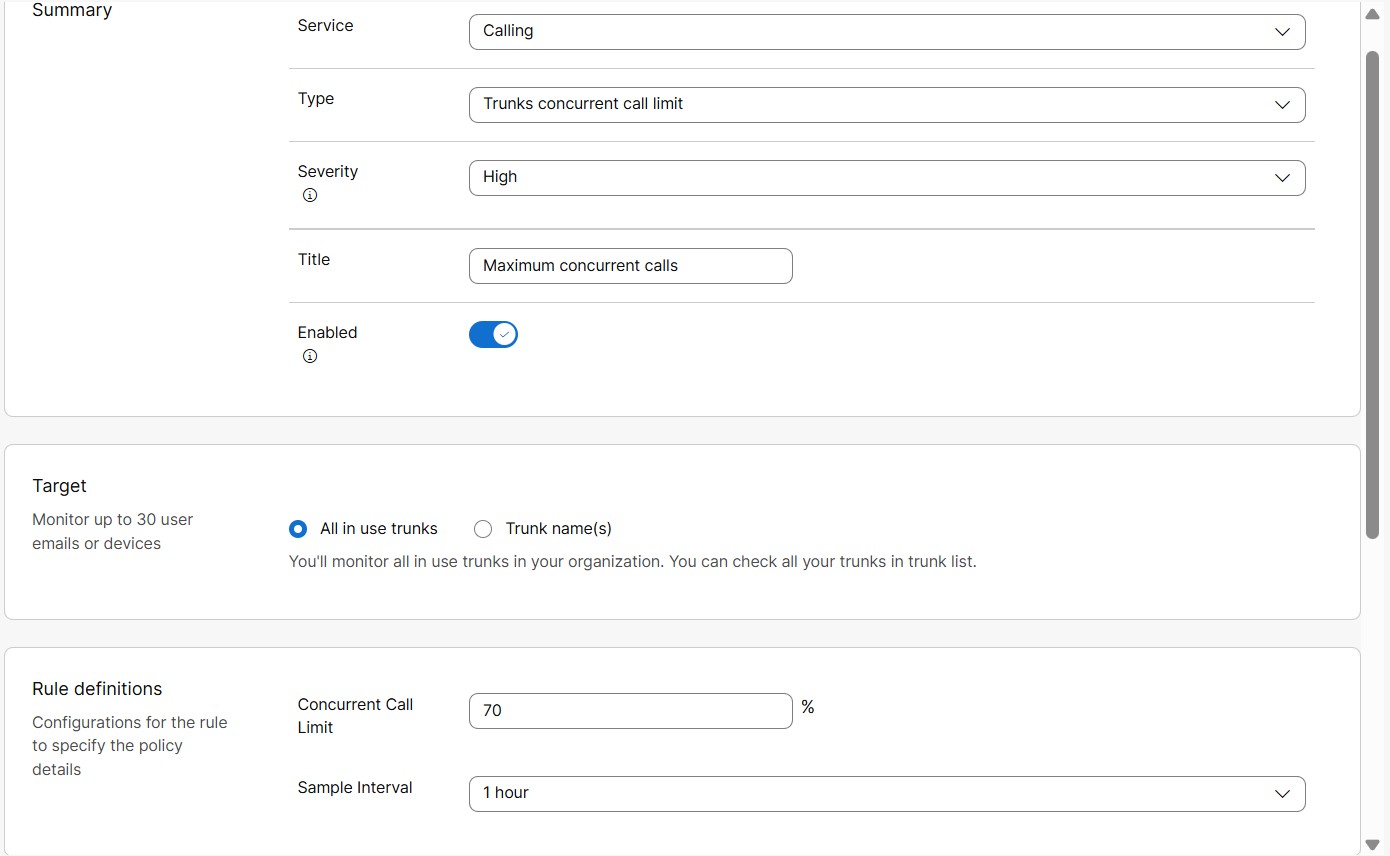 |
| 5 |
Iz padajuće liste Tip izaberite Trunk istovremeni limit poziva. |
| 6 |
Iz padajuće liste Ozbiljnost . Ovo polje pokazuje koliko je ozbiljno ili važno upozorenje. Možete odabrati nivo ozbiljnosti kao visok, srednji ili nizak.
|
| 7 |
Unesite naslov. |
| 8 |
Uključite Omogućeno da primate obaveštenja za upozorenje. |
| 9 |
U odeljku Target izaberite Trunk name(s). Možete da unesete do 30 debla za praćenje.
Upozorenja se ne pokreću na deblima zasnovanim na namenskoj instanci (DI). |
| 10 |
U odeljku Definicije pravila, možete definisati pravilo kada upozorenje treba da se pokrene. Unesite sledeće vrednosti za uslov praga ograničenja istovremenog poziva: |
| 11 |
U odeljku Kanal isporuke izaberite kako da primate upozorenja:
|
| 12 |
Kliknite na Sačuvaj. |
Upozorenje o isteku sertifikata prtljažnika
Upozorenje se šalje kada sertifikat prtljažnika zasnovanog na sertifikatu uskoro istekne ili je istekao. Ovo je sistemski generisano upozorenje, podrazumevano omogućeno za organizacije sa deblima zasnovanim na sertifikatima.
Pre isteka sertifikata, automatska upozorenja se šalju u unapred definisanim danima, kao što su 60. dan, 30. dan, 15. dan i 7. dan pre isteka. Nakon isteka sertifikata, upozorenje se šalje odmah i samo jednom. Ne šalju se uzastopna upozorenja.
Upozorenja se ne pokreću na deblima zasnovanim na namenskoj instanci (DI).
Lista ruta poziva blokiran upozorenje
Kada broj istovremenih poziva prelazi ograničenje dozvole za Route List Calls, dozvoljeno je do 20% dodatnog kapaciteta (pucanje). Kada off-net (PSTN) obim poziva prelazi 20% granice pucanja, oni su blokirani. Upozorenje se šalje korisniku o Route List pozivi su blokirani.
Pre nego što počnete
| 1 |
Prijavite se na Control Hub. |
| 2 |
Idite na . Lista svih pravila je prikazana.
|
| 3 |
Izaberite Route List Pozivi blokiran upozorenje. Ruta lista poziva Blokirano upozorenje je sistemski generisano upozorenje. Zbog toga možete da izmenite samo nekoliko njegovih detalja kao što je pomenuto u sledećim koracima. 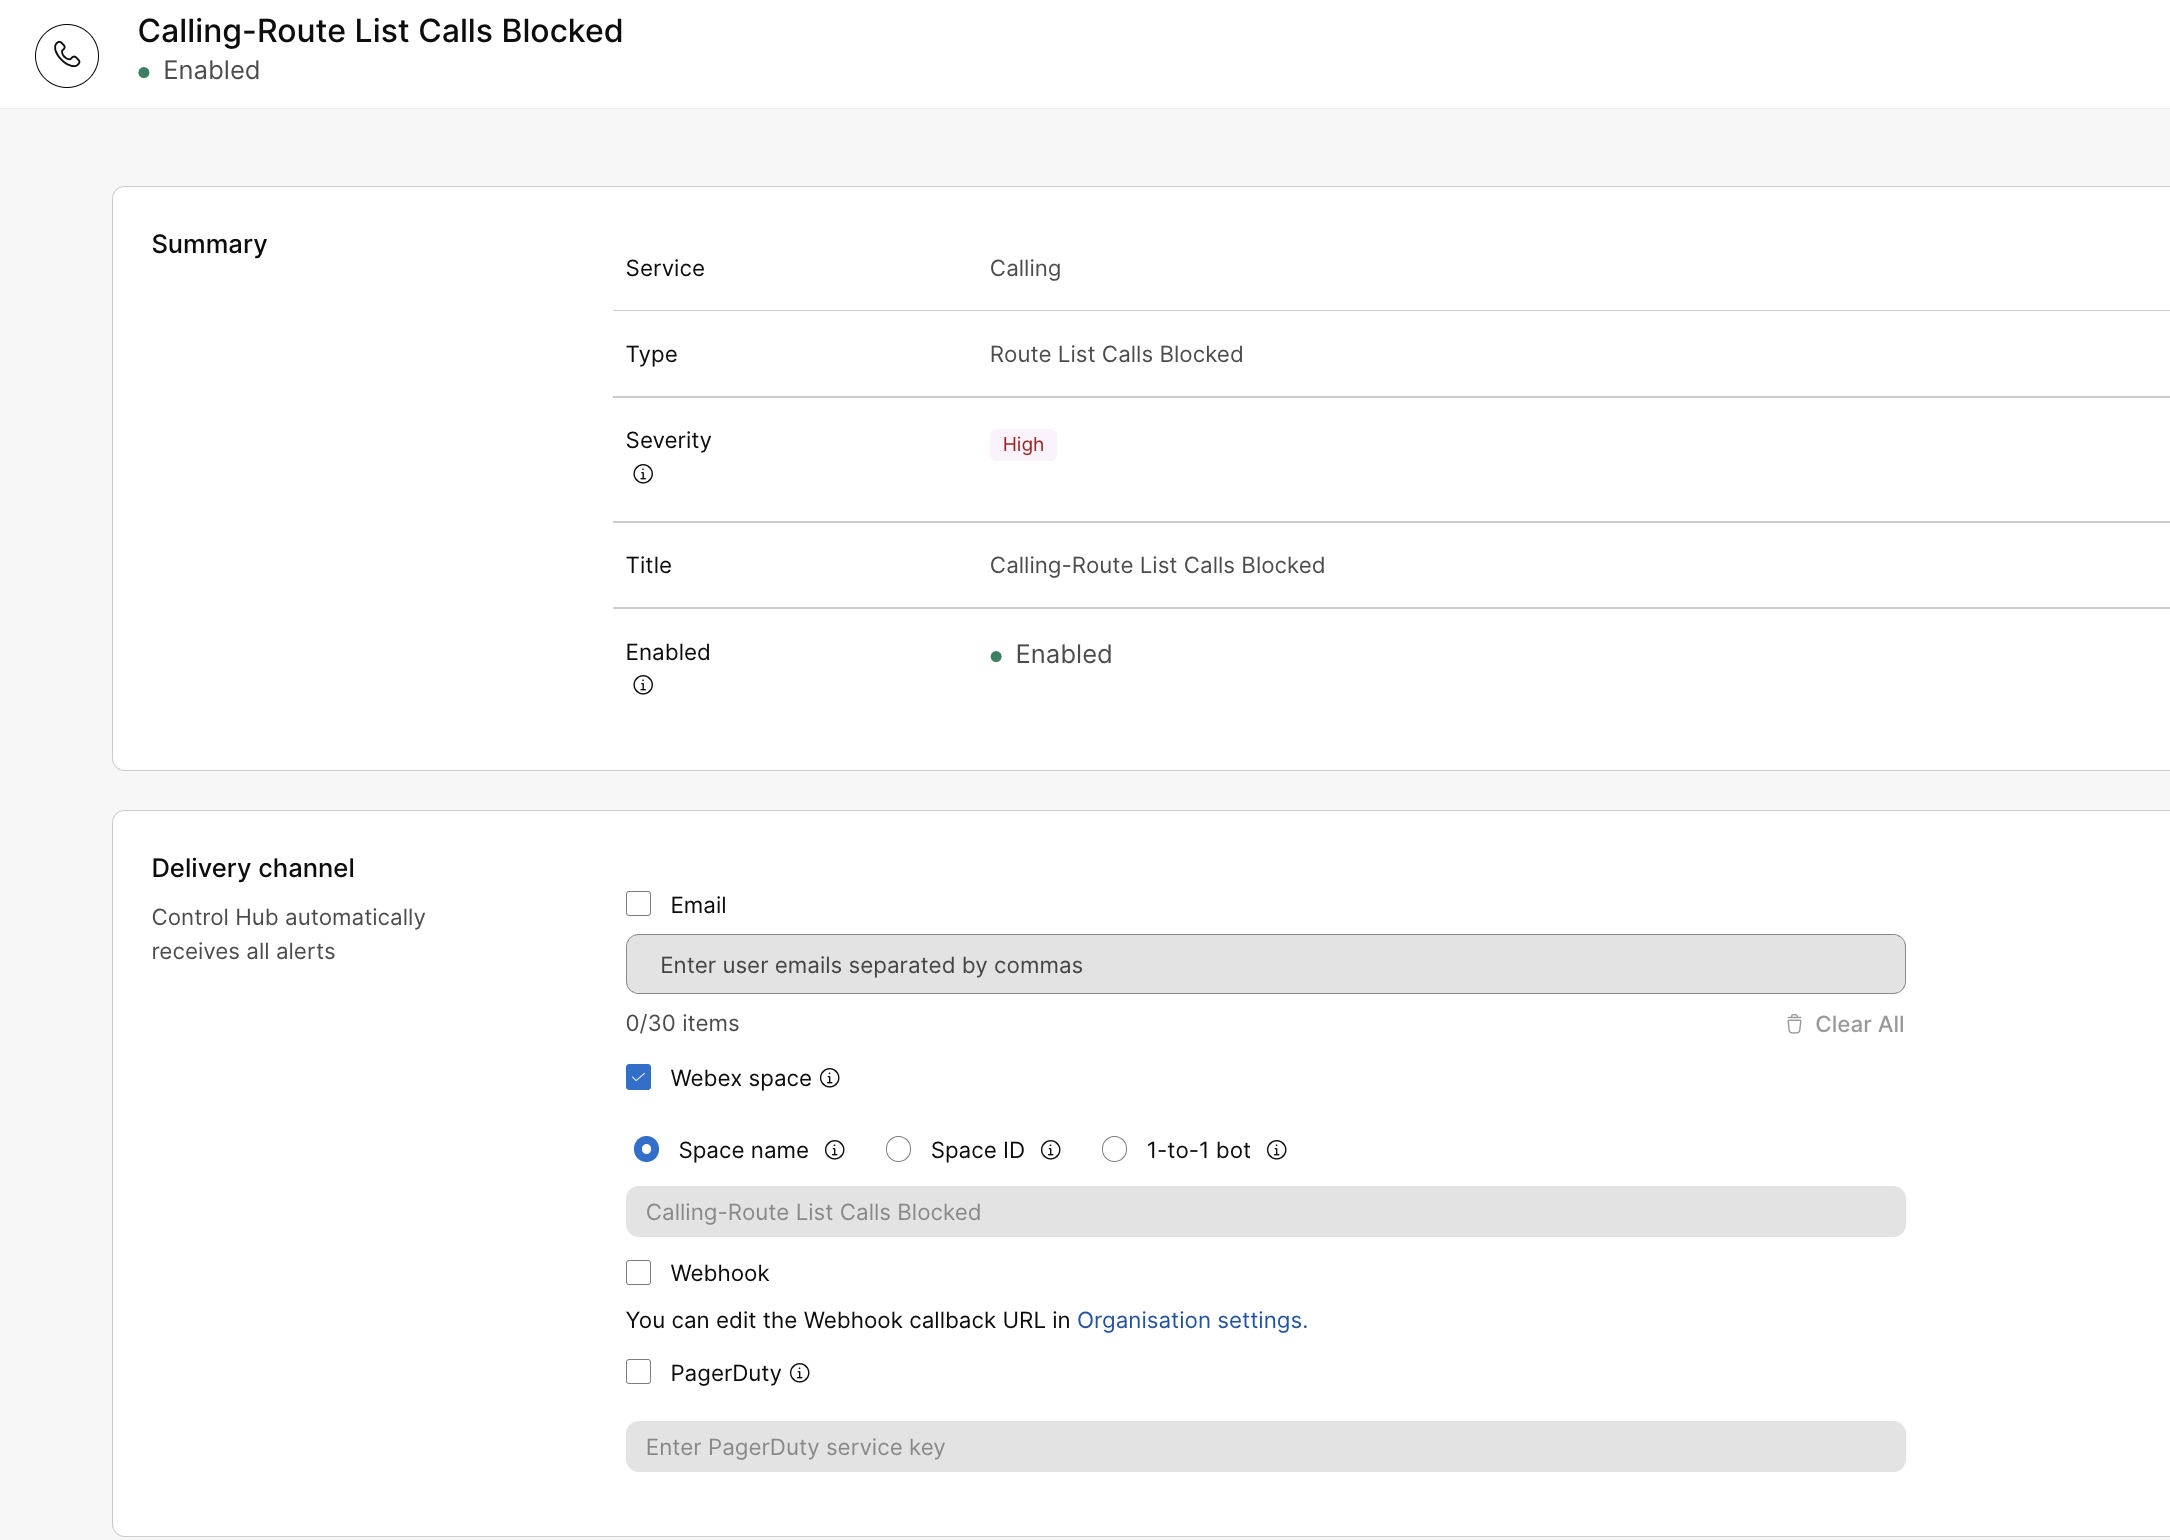 |
| 4 |
U odeljku Kanal isporuke izaberite kako da primate upozorenja:
|
| 5 |
Kliknite na Sačuvaj. |
Za uređaje možete kreirati pravila za dobijanje upozorenja za:
- Offline i online događaji – događaj se registruje nakon što je uređaj bio van mreže 10 minuta ili se vratio na mrežu pre 10 minuta. Možete kreirati do 100 ovih upozorenja.
- Problemi koji su otkriveni ili rešeni događaji – Možete da izaberete da li želite da primate sva upozorenja ili isključite zvuk onih koje ne želite da primate. Možete kreirati do 100 ovih upozorenja.
- Istek verzije softvera – upozorenje se šalje 14 dana i 3 dana pre isteka verzije softvera za uređaj. Možete kreirati do 10 ovih upozorenja
Pogledajte ovaj članak za više detalja o tome kako da podesite upozorenja za uređaje u vašoj organizaciji.
Upozorenja o PhoneOS telefonima na Control Hub-u
Kao administrator, možete proveriti status telefona koji su registrovani na Vebek pozivima. Ako se pojavi bilo kakav problem na telefonu, detalje možete videti u odeljku Pitanja i informacije pod Uređaji za dijagnostiku i rešavanje problema.
Takođe, možete da vidite sva upozorenja koja su prijavljena telefonom u centru za upozorenja. Za više informacija o centru za upozorenja, pogledajte Centar za upozorenja u Control Hub-u.
Protokol poziva
| Ime za prikaz | Kôd | Tip | Poruka | Nivo |
|---|---|---|---|---|
| Ograničena usluga | Srpsko-hrvatski | Ograničena usluga | SRST režim - ovaj telefon ima ograničenu uslugu.
Poruka se takođe može prikazati na ekranu telefona. | Upozorenje |
| Sip registracija profila | SIPProfileRegistration | SIP registracija nije uspela | SIP registracija nije uspela | Greška |
Mreža
| Ime za prikaz | Kôd | Tip | Poruka | Nivo |
|---|---|---|---|---|
| Otkriven je gubitak paketa | Mrežni kvalitet | Otkriven je gubitak paketa | Tokom poslednjeg poziva otkrili smo nivo gubitka paketa koji je možda uticao na kvalitet poziva. Gubitak paketa je obično uzrokovan zagušenjem mreže. | Upozorenje |
Dugme za akciju
| Ime za prikaz | Kôd | Tip | Poruka | Nivo |
|---|---|---|---|---|
| Dugme za akciju nije konfigurisano | actionbuttonnotconfig | Dugme za akciju nije konfigurisano | Dugme Akcija nije konfigurisano. Konfigurišite ga u svim konfiguracijama > telefonu >Akciono dugme. | Upozorenje |
| Akcija dugme hitna služba nije dostupna | hitnaNedostupno | Akcija dugme hitna služba nije dostupna | Nemoguće je pristupiti hitnoj službi jer nijedna linija nije registrovana. Neće uspeti da koristi dugme za akciju ili brojeve za biranje za pristup usluzi. | Upozorenje |
Bezbednost
| Ime za prikaz | Kôd | Tip | Poruka | Nivo |
|---|---|---|---|---|
| Upis SCEP sertifikata nije uspeo | scepcertenrollmentfailed | Upis SCEP sertifikata nije uspeo | Upis SCEP sertifikata nije uspeo | Greška |
Konfiguracija
| Ime za prikaz | Kôd | Tip | Poruka | Nivo |
|---|---|---|---|---|
| Failed to apply configuration changes | wxcresyncfailed | Failed to apply configuration changes | Telefon nije uspeo da primeni promene konfiguracije. Konfiguracije mogu biti zastarele. | Greška |
| Nadogradnja nije uspela | vxcupgradefailed | Nadogradnja nije uspela | Telefon nije uspeo da ažurira firmver. Proverite da li uređaj ima radnu mrežnu vezu, da je DNS konfigurisan i da nije blokiran zaštitnim zidovima ili punomoćnicima. | Greška |
Postoje dve kategorije servisnih upozorenja za namensku instancu: Upozorenja o održavanju i proaktivna upozorenja.
Upozorenja o održavanju
Sistem podrazumevano omogućava upozorenja o održavanju. Administratori partnera ili kupaca treba da potvrde ili konfigurišu kanal isporuke za primanje obaveštenja putem e-pošte i / ili Vebek prostora. Upozorenja o održavanju se koriste za slanje obaveštenja o održavanju, prekidima i komunikaciji o incidentima.
Da biste dodali informacije o kanalu isporuke za primanje upozorenja o održavanju:
- Iz pogleda kupca u https://admin.webex.com, idite na Alerts centar.
- Izaberite .
- Kliknite na Poziv-Održavanje i Outage Alerts i pomerite se nadole do Kanal isporuke.
- Izaberite jedno ili oba polja za potvrdu E-pošta ili Vebek prostori da biste primili obaveštenje na željenom kanalu.
Možete dodati do 30 ID-ova e-pošte.
Da biste primali obaveštenja u Vebek prostoru, morate imati licencu za razmenu poruka. Ako je pristup botovima omogućen u aplikacijama / botovima i dozvoljeno vam je da budete član prostorije za organizaciju, dobićete obaveštenja. U suprotnom, obratite se administratoru organizacije da biste rešili problem.
Možete da izaberete Vebhooks ako imate omogućene Vebhooks na organizacionom nivou. Za više informacija, pogledajte Omogući vebhooks za upozorenja u Control Hub-u.
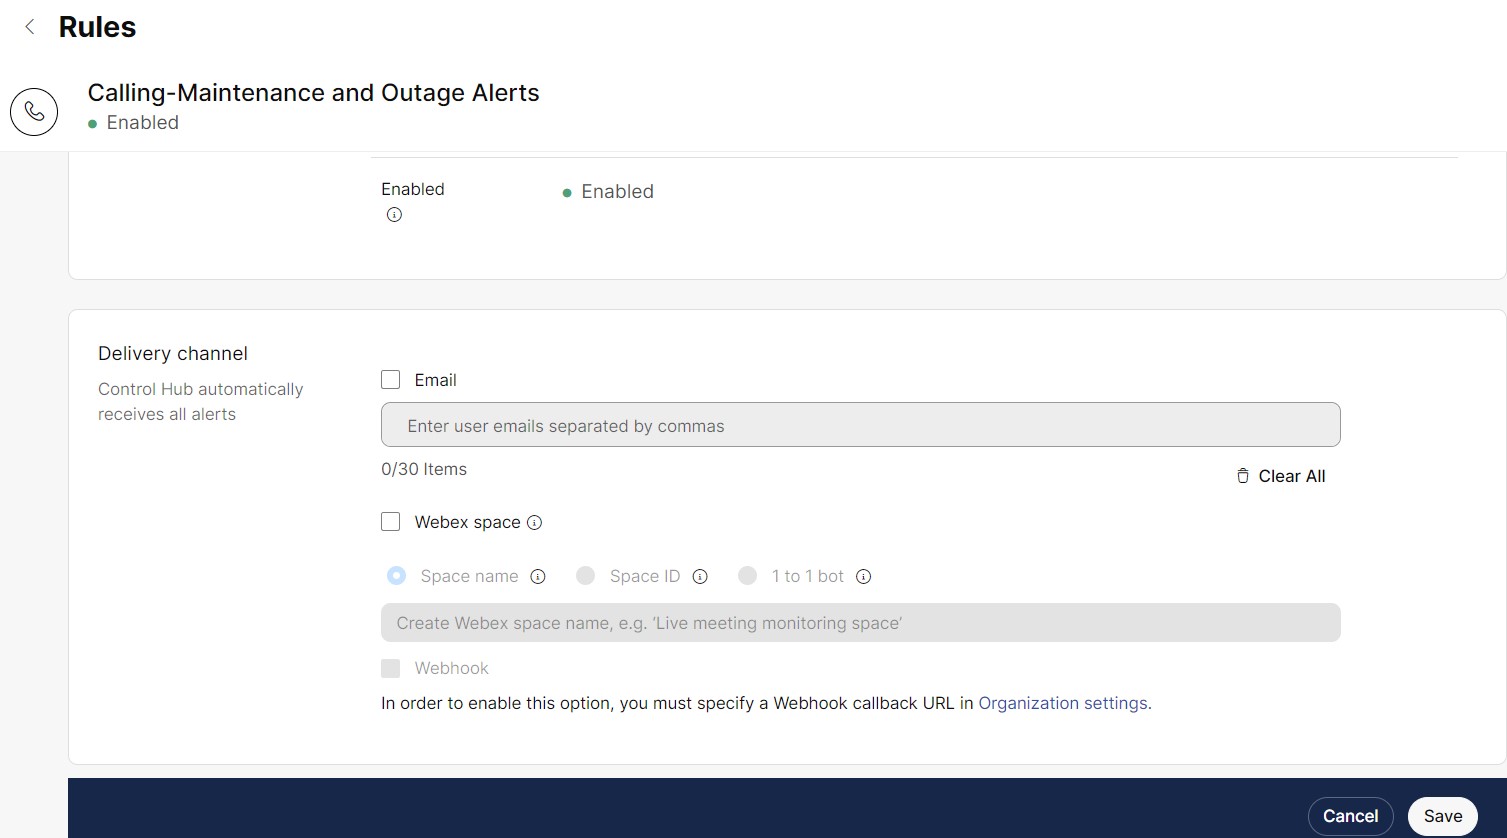
- Unesite informacije o e-pošti i Vebek prostoru i kliknite na dugme Sačuvaj da biste sačuvali promene.
Kad god dođe do održavanja, Control Hub automatski prikazuje baner sa detaljima klastera, regionom i zakazanim datumom i vremenom.

Proaktivna upozorenja
Administratori partnera ili kupaca mogu se pretplatiti na proaktivna upozorenja i obaveštenja o događajima drugog ili trećeg dana i izabrati da ih isporučuju putem e-pošte, prostora Vebek App ili oboje odabirom kanala isporuke prilikom kreiranja upozorenja.
Na primer: Unified CM Video Conf Bridge Out of Resource Count High, Unified CM MTP Out of Resource Count High.
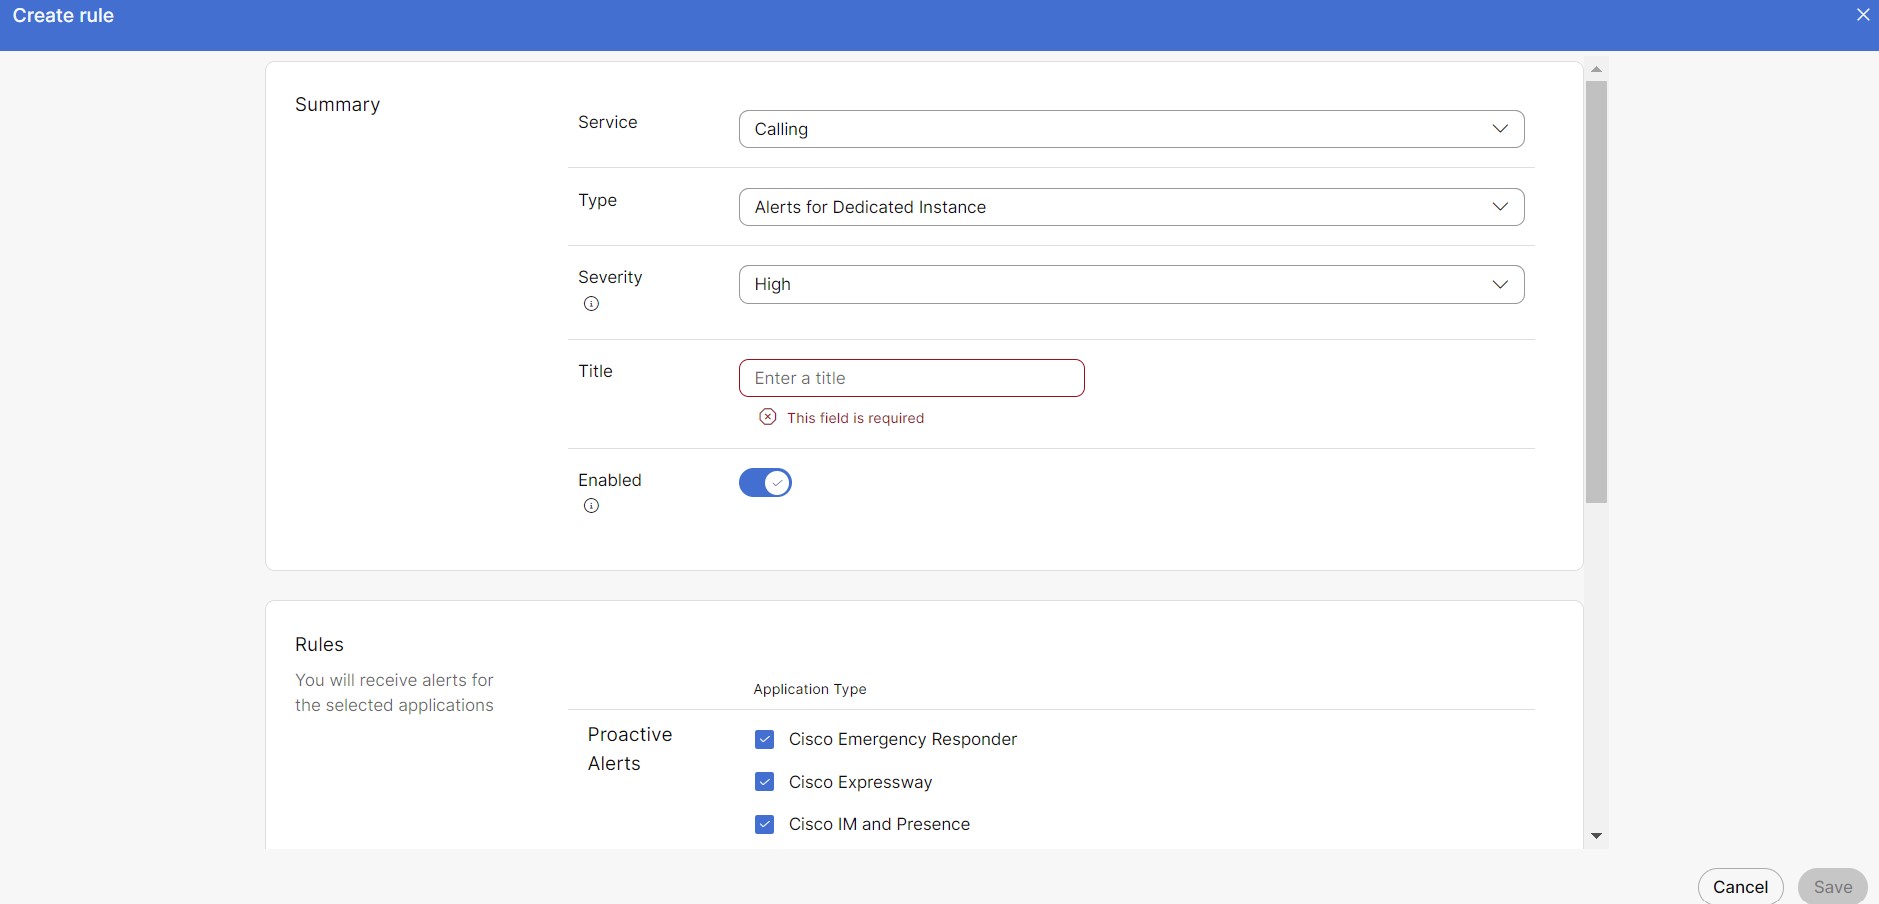
Da biste kreirali proaktivno pravilo upozorenja
Samo partner ili administrator klijenta sa punim administratorskim pravima može kreirati pravila.
- Iz pogleda kupca u https://admin.webex.com, idite na Alerts centar.
- Izaberite .
- U odeljku Rezime :
- Izaberite Pozivanje sa padajuće liste Servis.
- Izaberite Upozorenja za namensku instancu iz padajuće liste Tip .
- Izaberite željenu ozbiljnost. Po defaultu ozbiljnost je visoka.
-
Preporučujemo kreiranje pravila za proaktivna upozorenja sa srednjom ili niskom ozbiljnošću.
-
Dobijate upozorenja koja odgovaraju ili premašuju nivo ozbiljnosti koji ste izabrali prilikom postavljanja pravila.
-
- Dodajte naslov za novo pravilo.
- Sva polja za potvrdu u Pravila sekcija su izabrana podrazumevano. Poništite one na osnovu vaših preferencija.
- Izaberite kanal isporuke da biste primili upozorenje.
Možete da izaberete Vebhooks ako imate omogućene Vebhooks na organizacionom nivou. Za više informacija, pogledajte Omogući vebhooks za upozorenja u Control Hub-u.
- Kliknite na Sačuvaj.
Kada se pravila kreiraju, potrebno je maksimalno 6 sati da počne da prima obaveštenja.
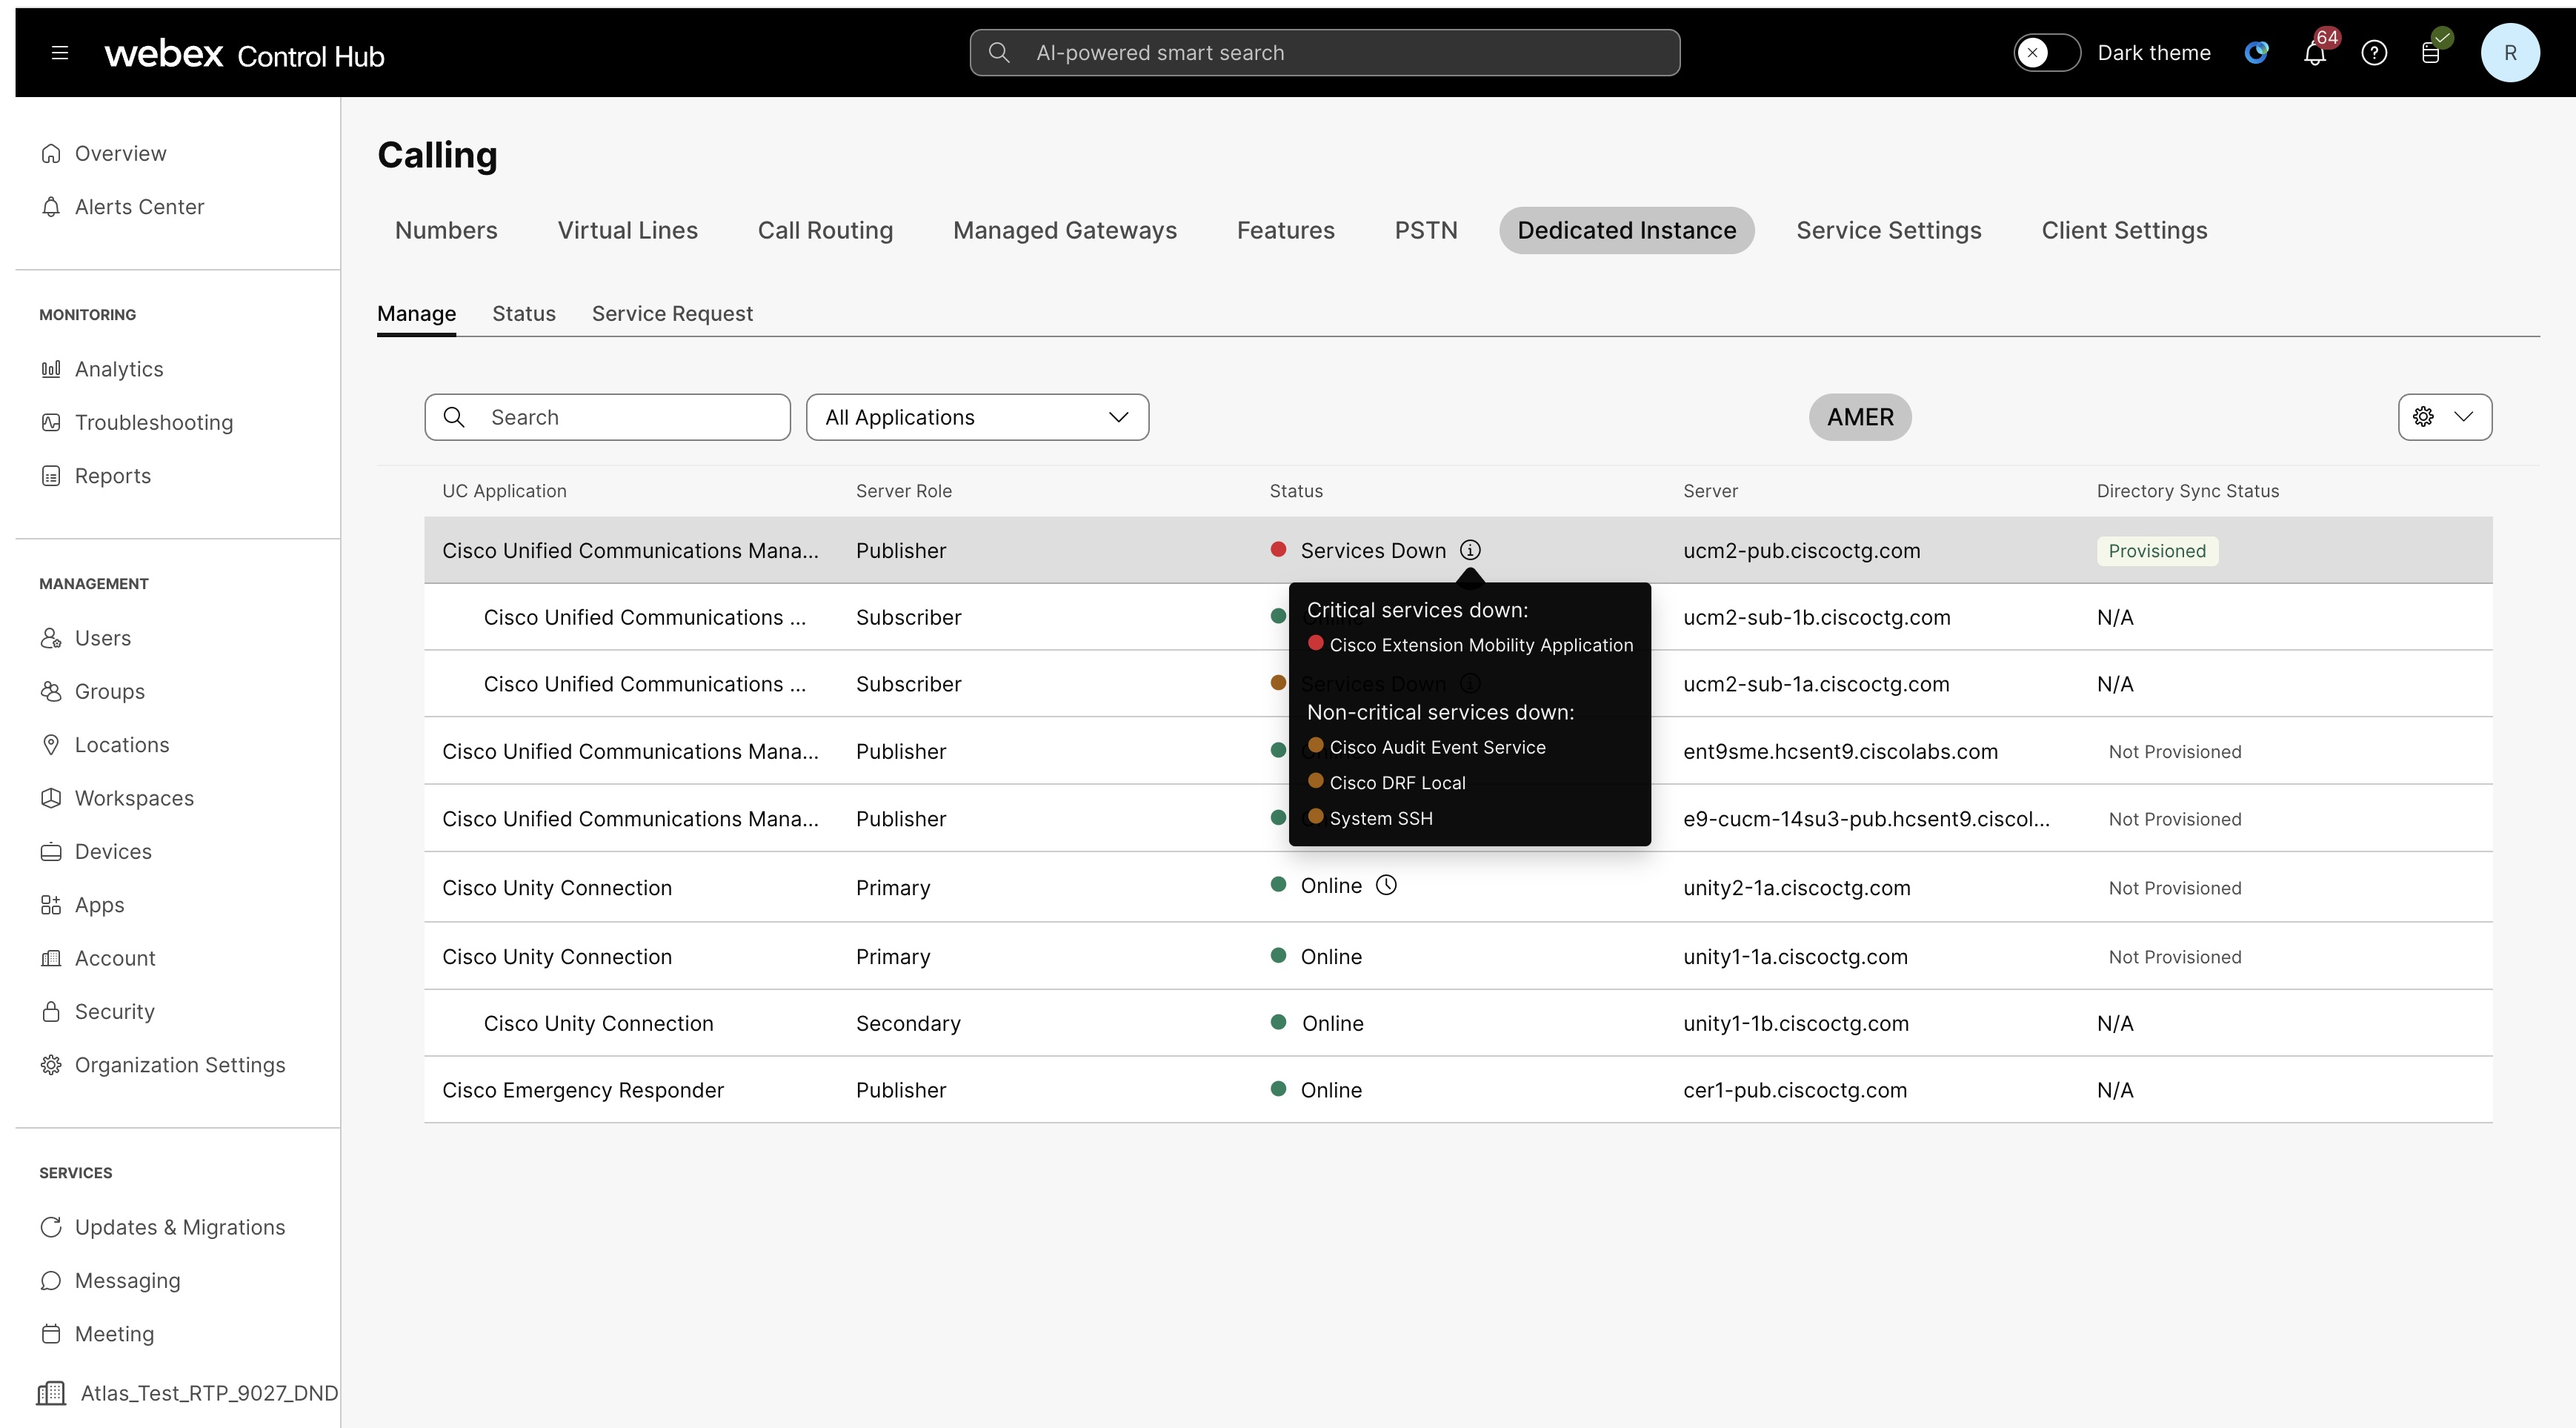
Status upozorenja i njihove legende
Control Hub konsoliduje statuse više UC aplikativnih usluga, statusa agenata i statusa održavanja svakog čvora.
Status usluga za svaki čvor se osvežava svakih KSNUMKS minuta.
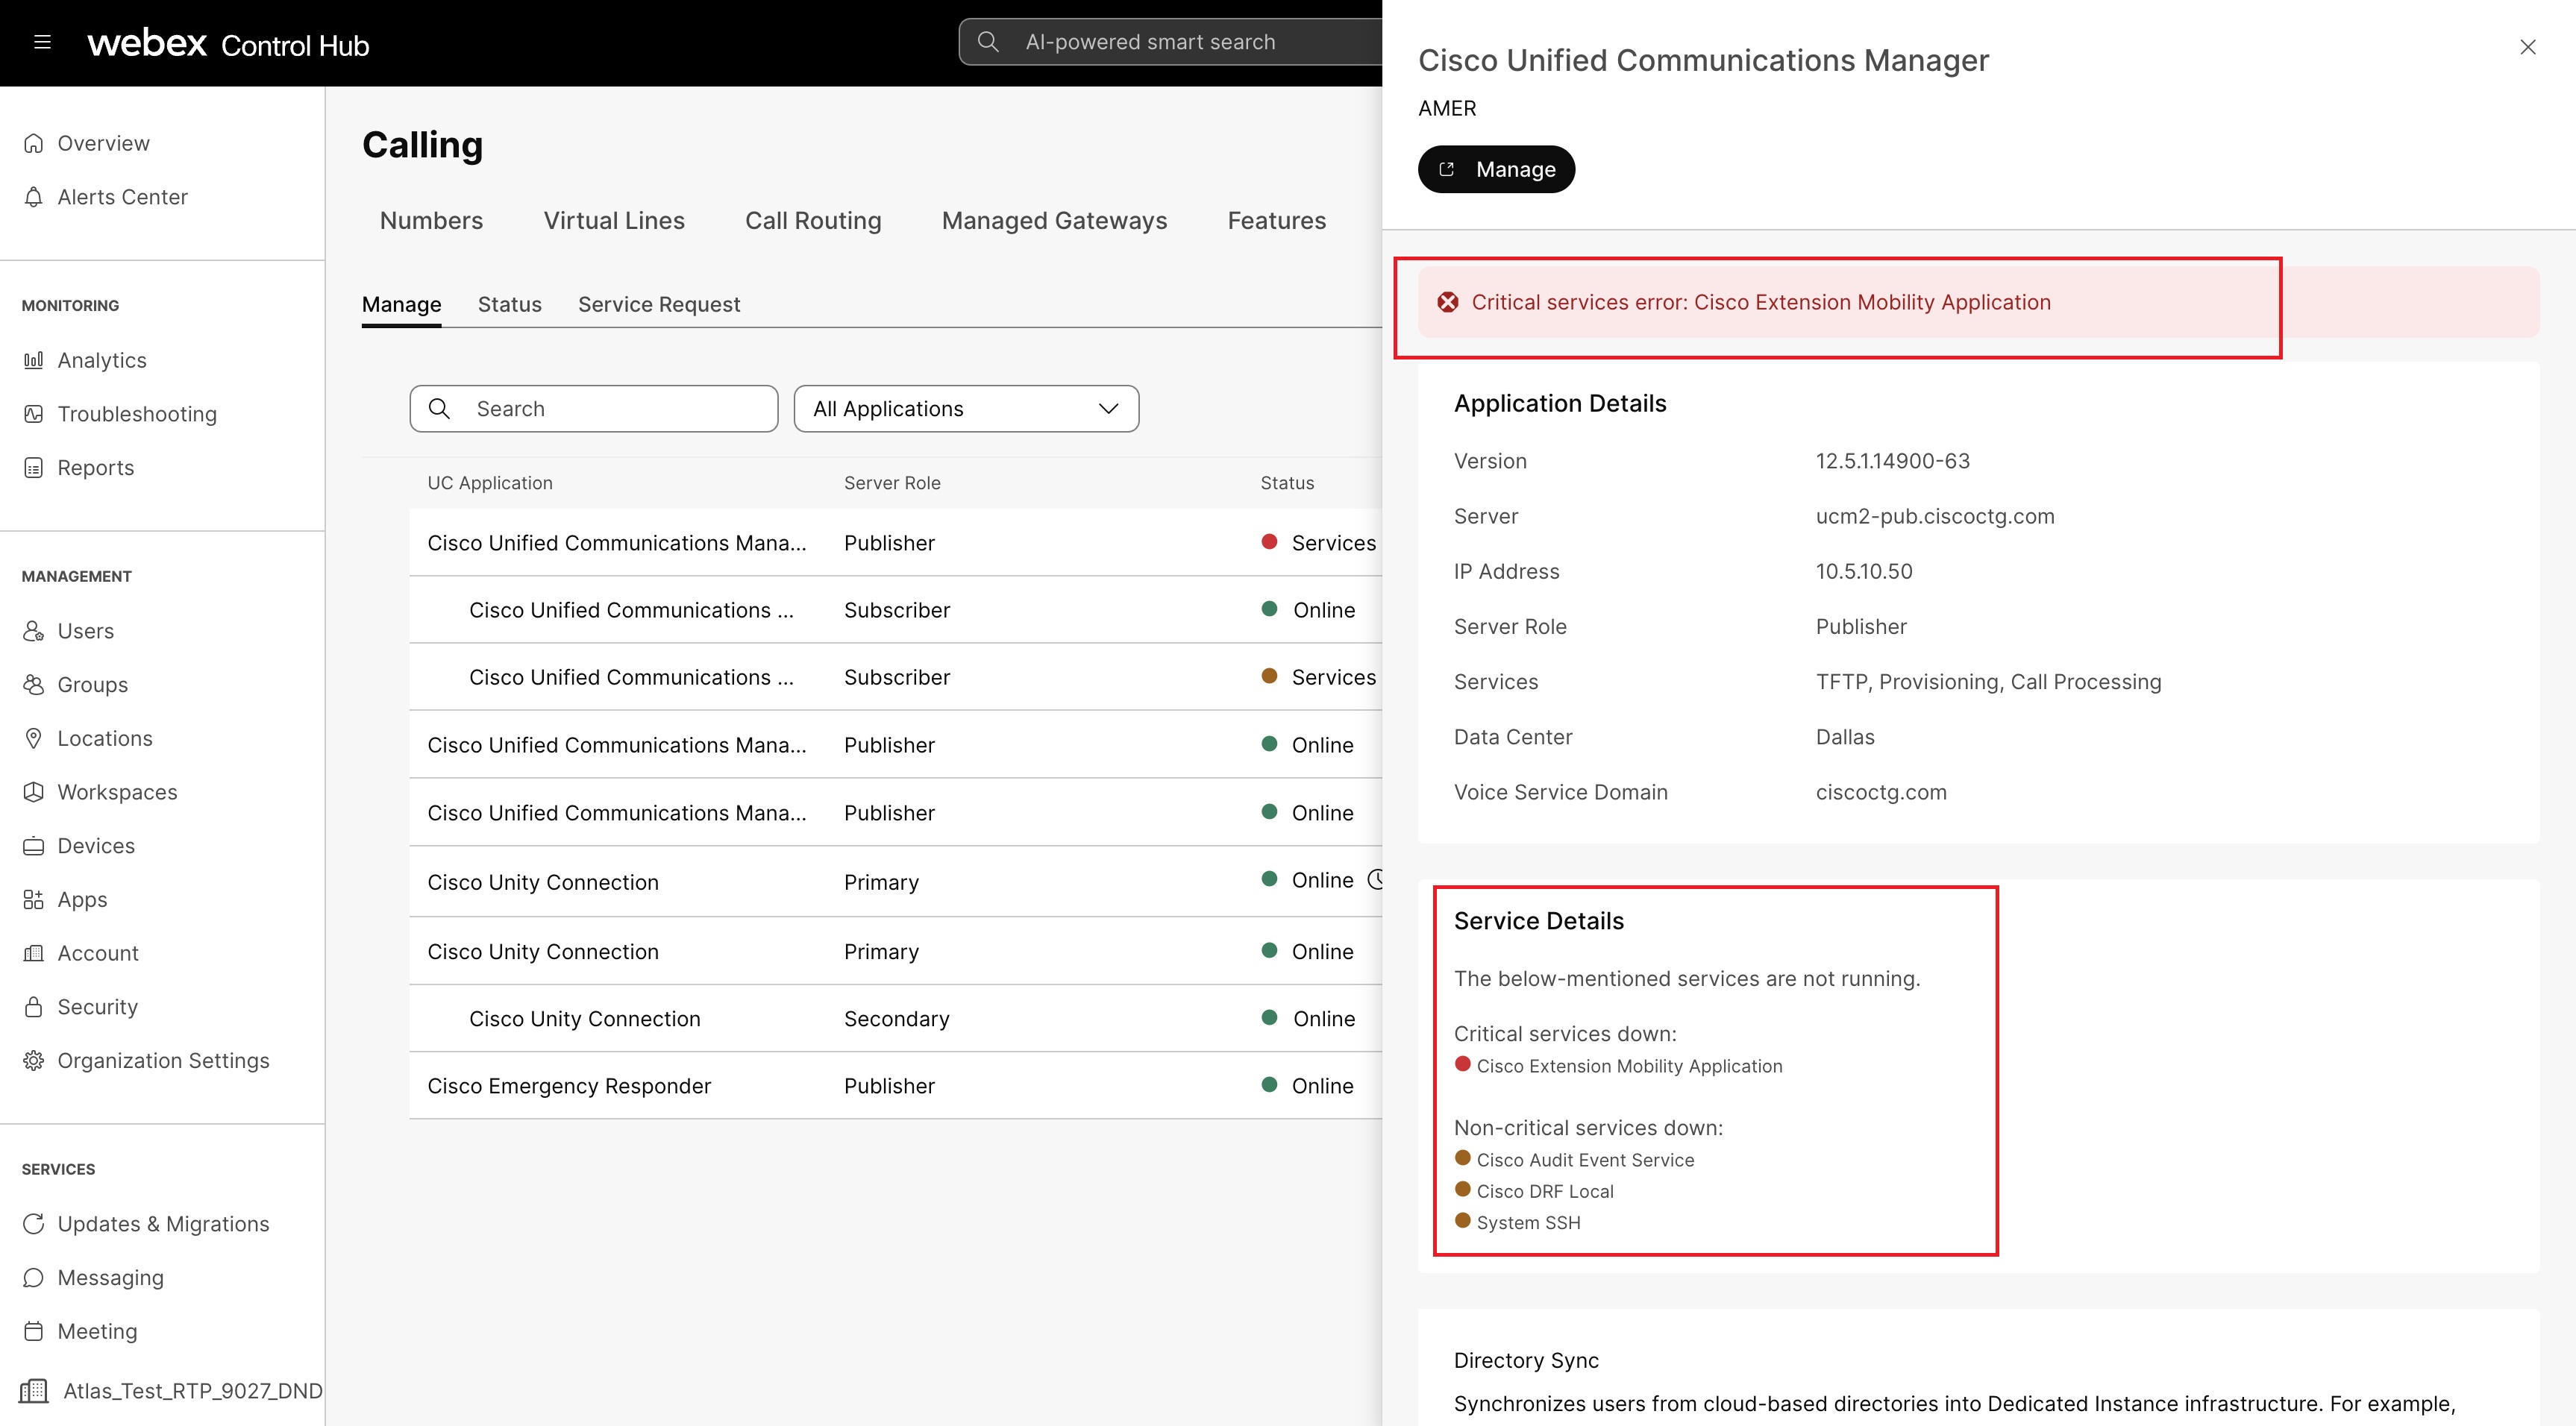
|
Kritična upozorenja |
|
|
|
|
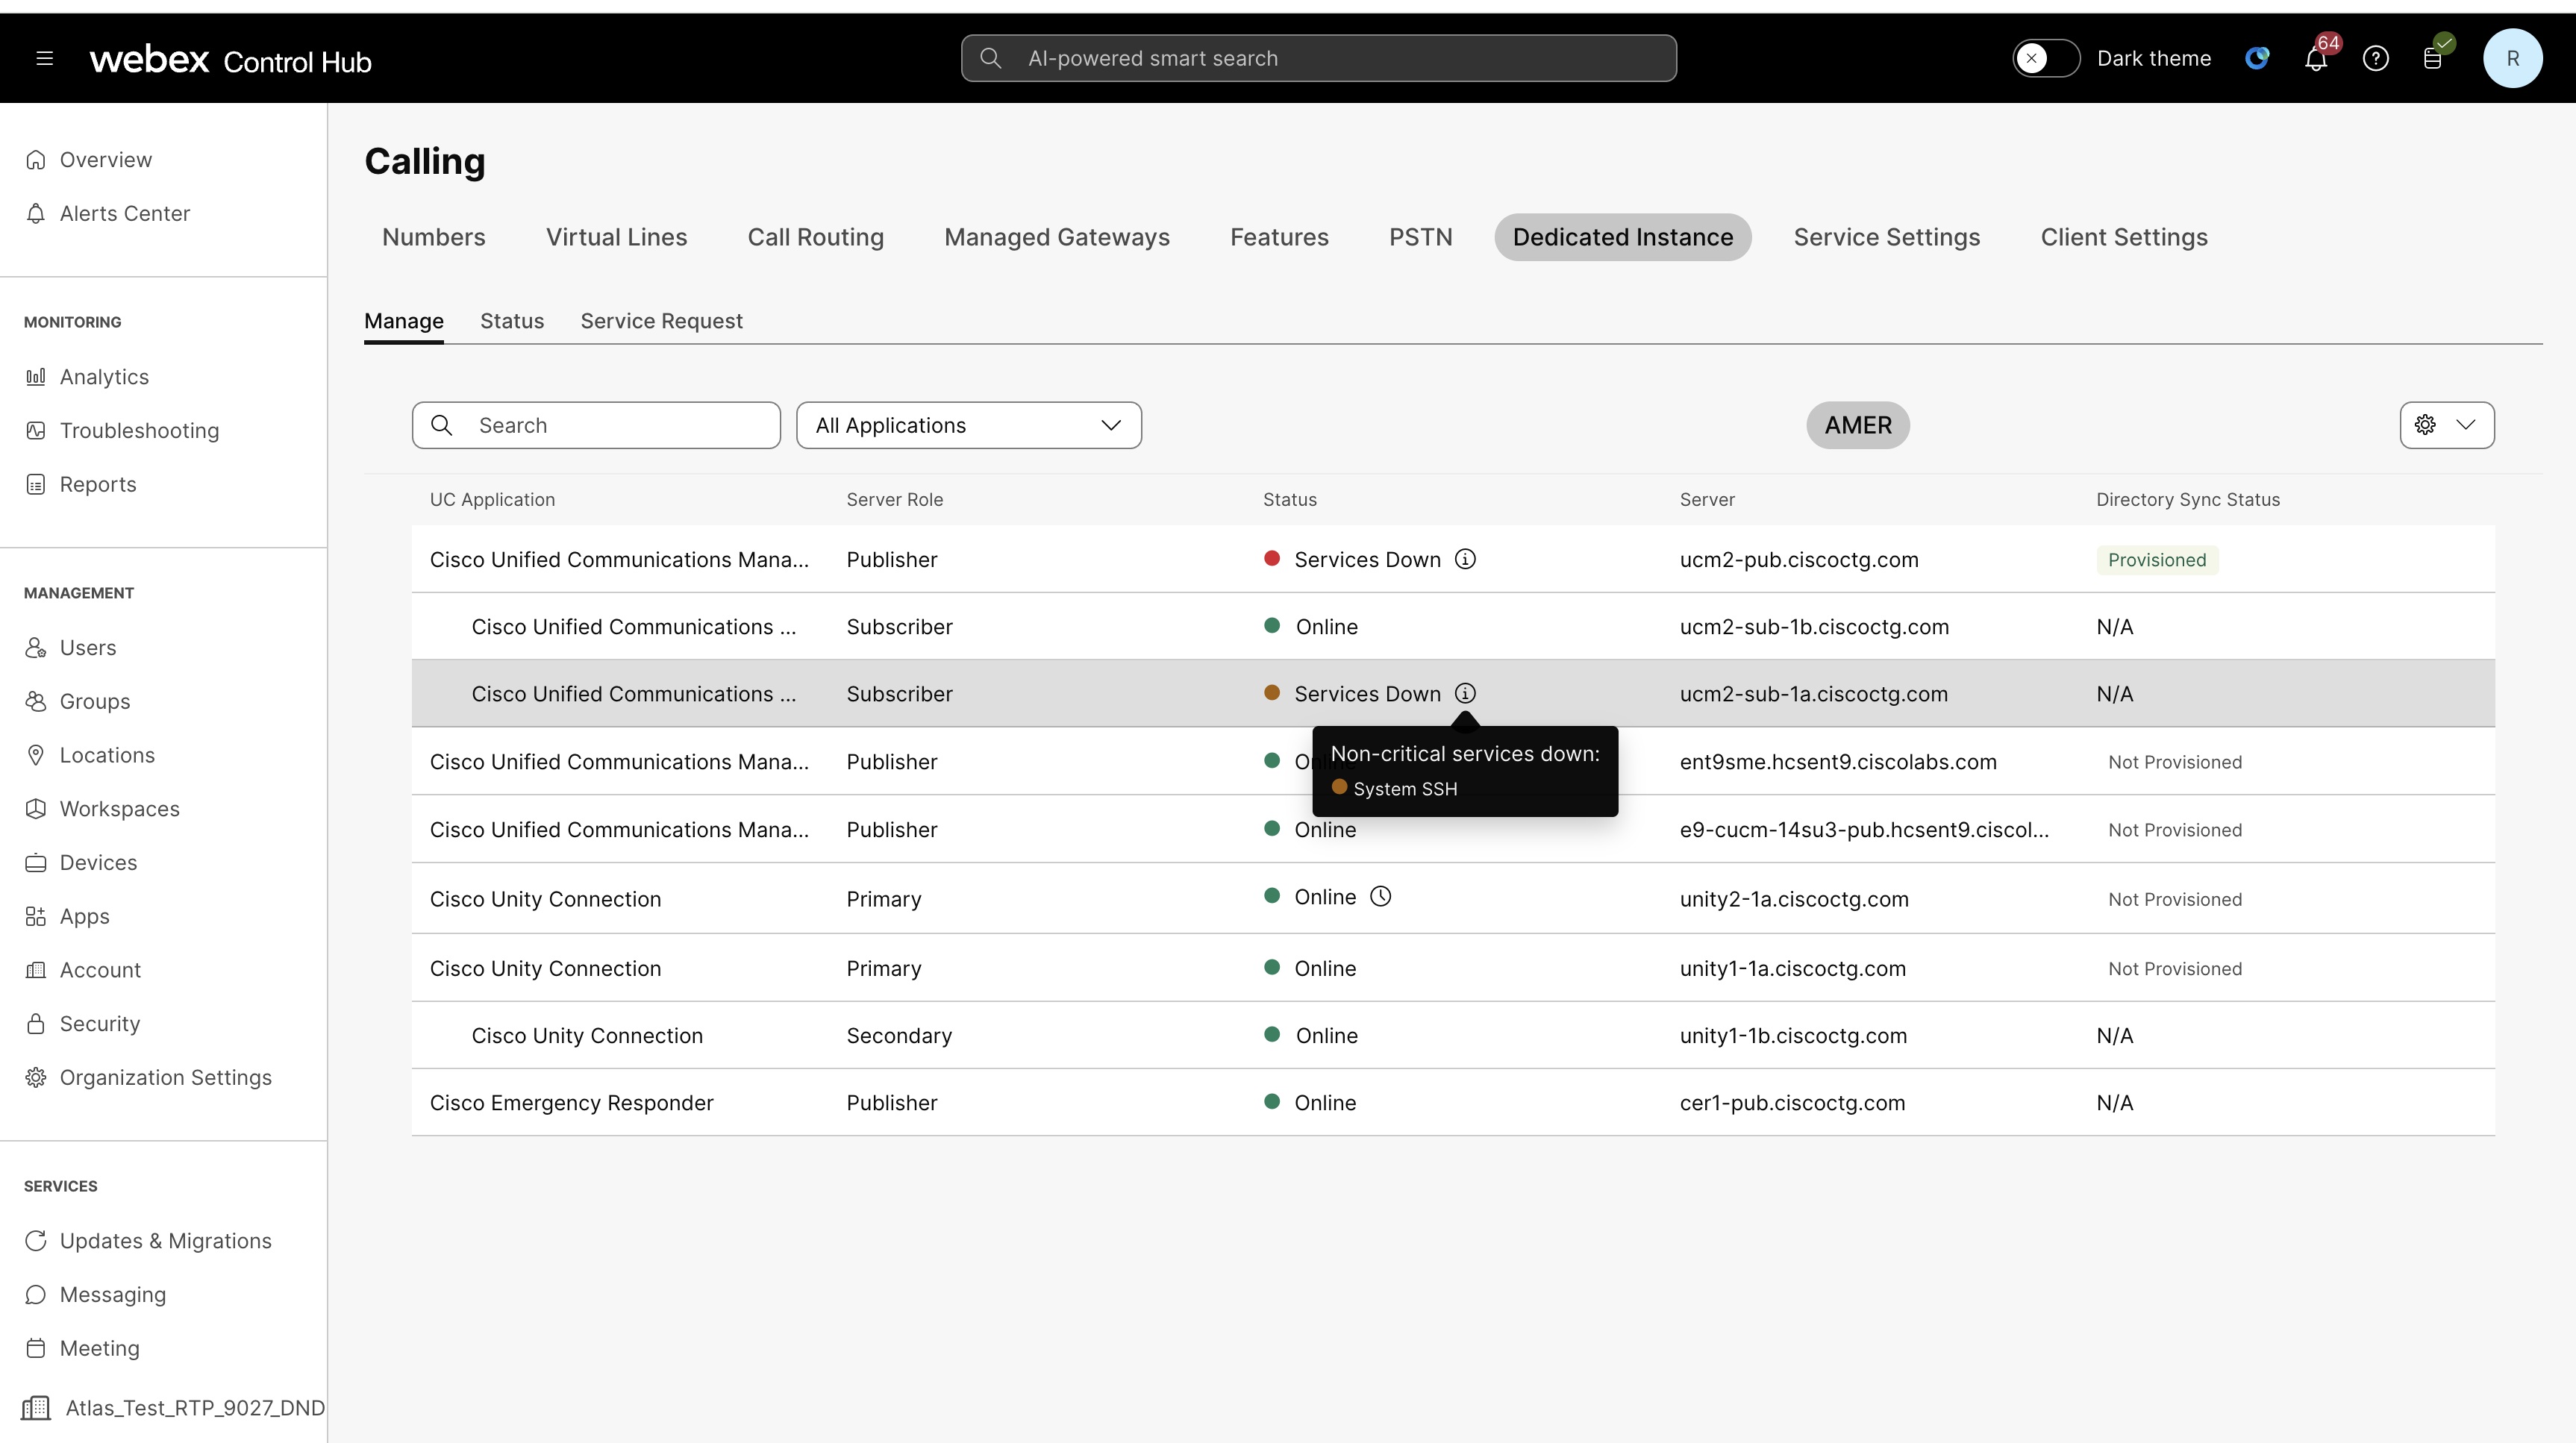
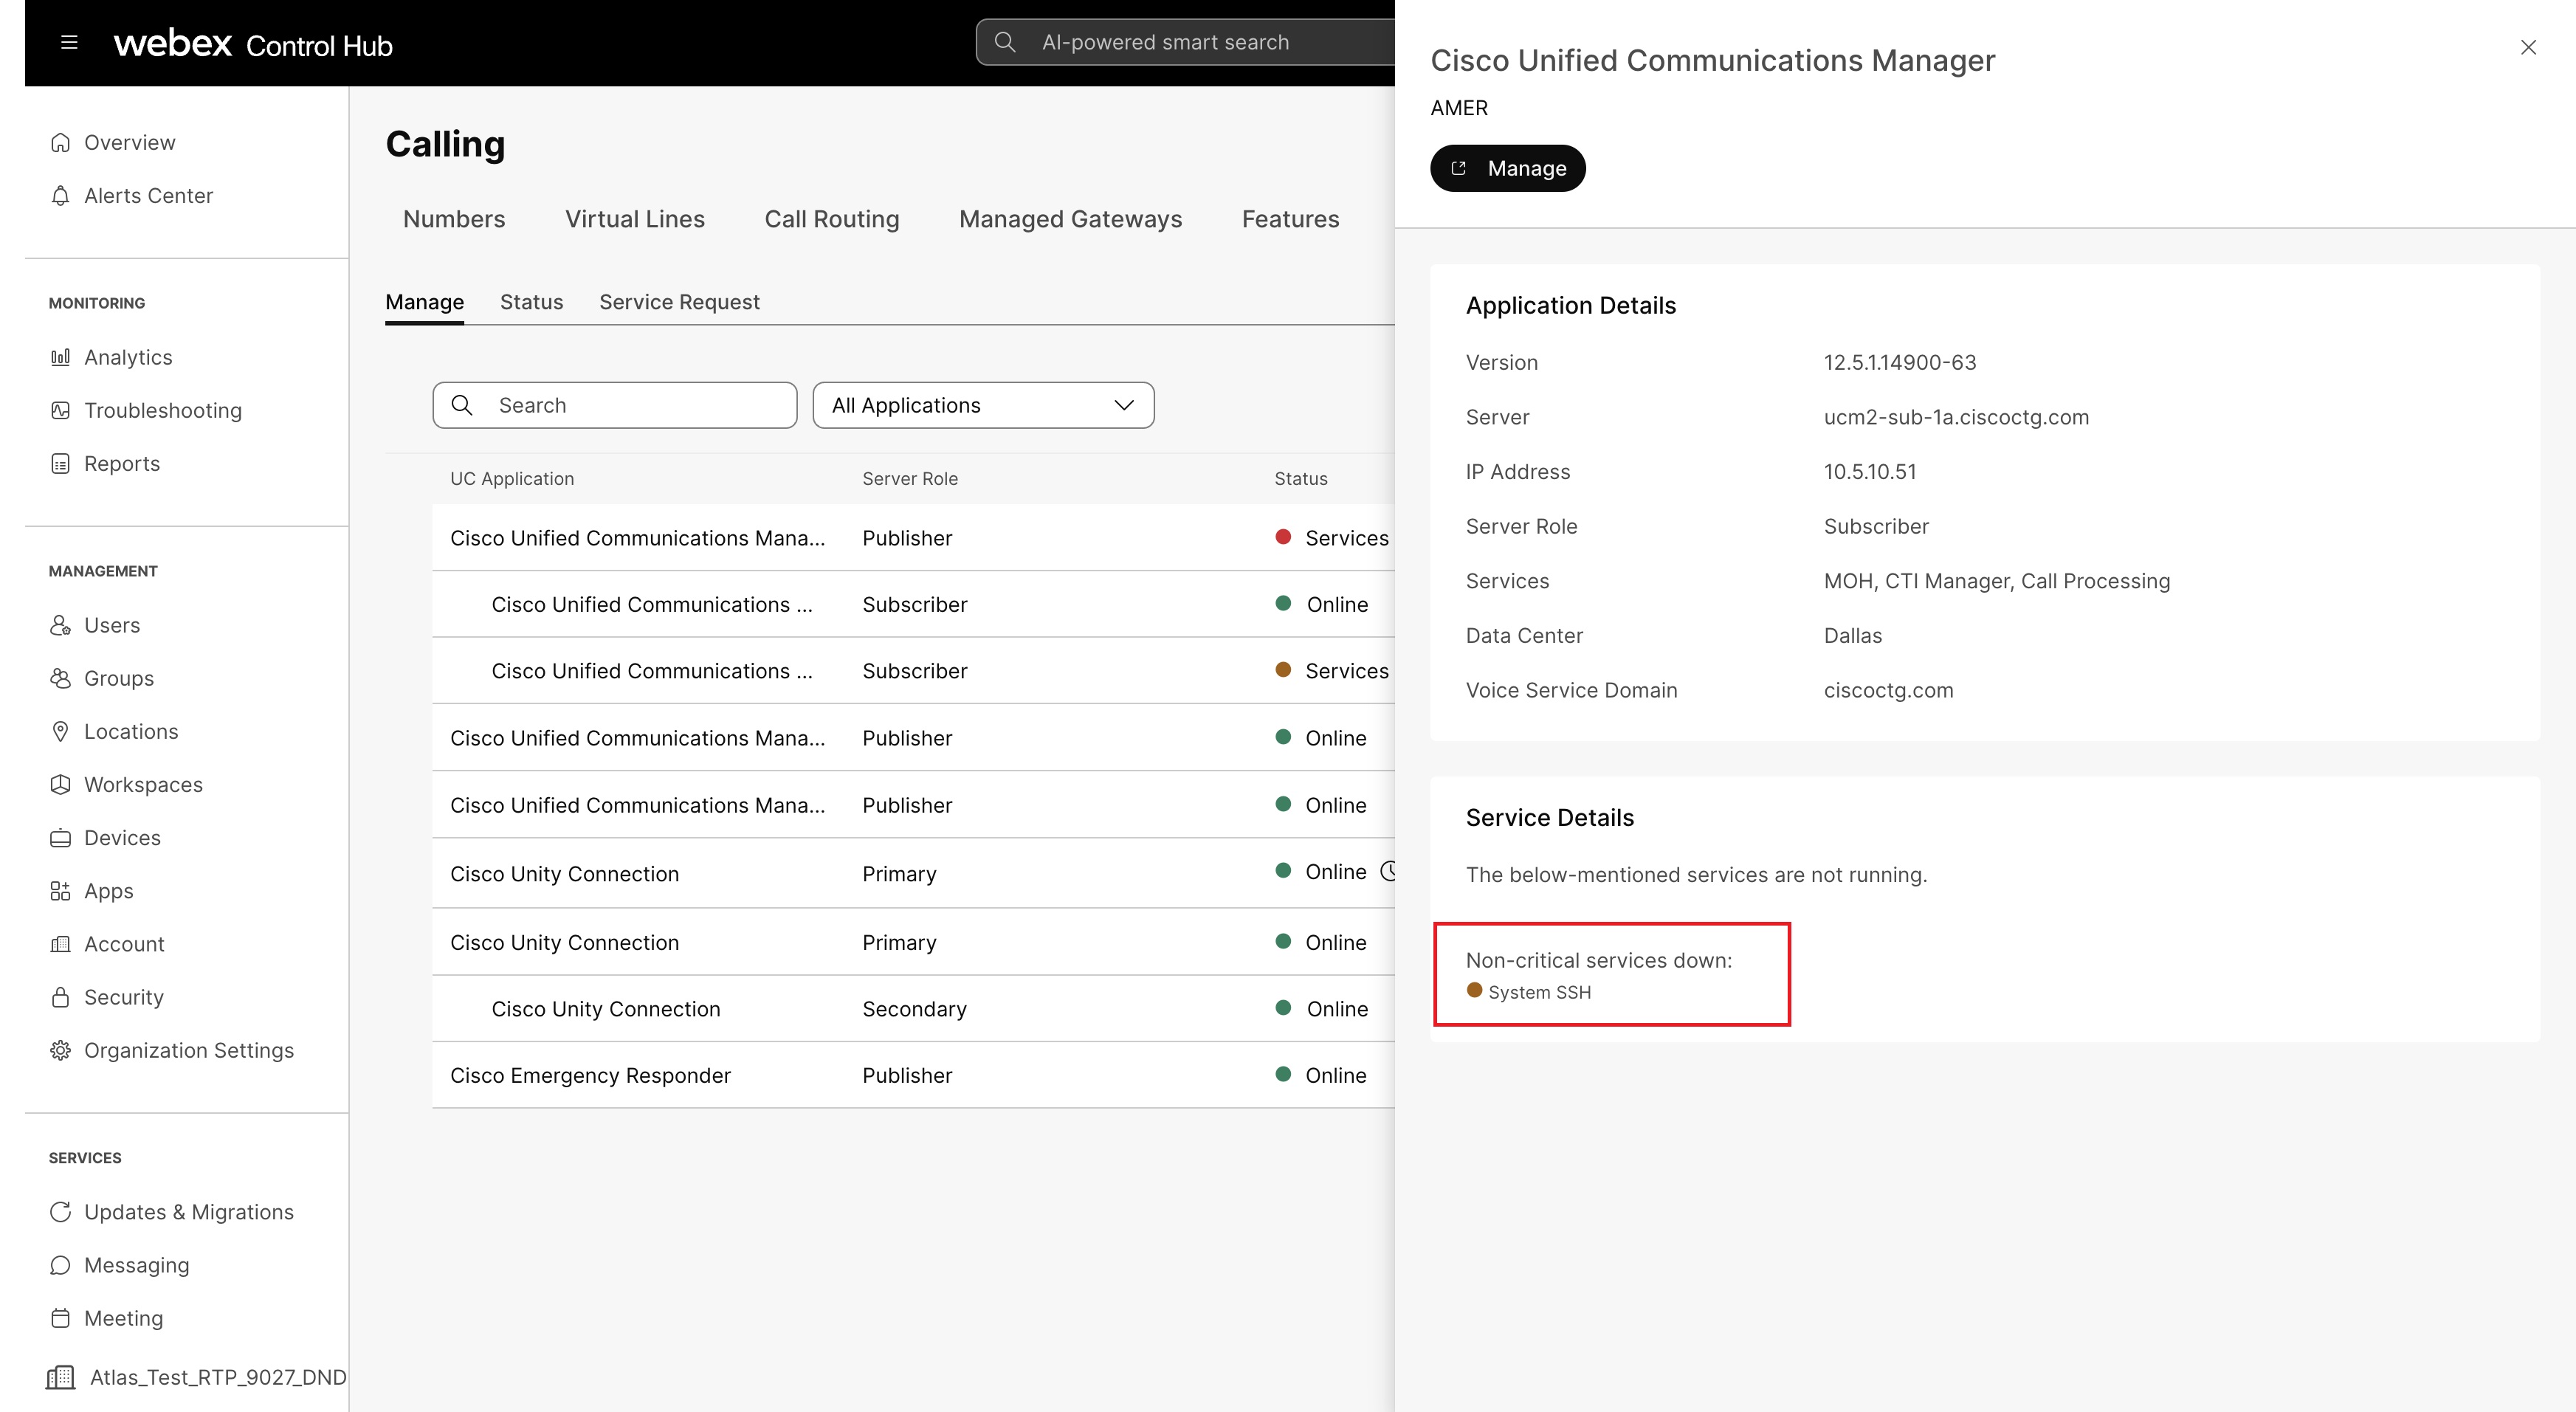
Nekritična upozorenja |
|
|
Sve ostale UC usluge koje nisu gore navedene smatraju se nekritičnim uslugama. |
Legende upozorenja
| Status | Boja | Opis |
| Na mreži | Zelena | Označava čvor funkcioniše normalno bez ikakvih problema |
| Održavanje | Narandžasta | Označava da čvor prolazi kroz održavanje |
| Usluge dole | Crvena | Označava da je jedna ili više kritičnih usluga dole na čvoru |
| Usluge dole | Narandžasta | Označava da je jedna ili više nekritičnih usluga dole na čvoru, ili je agent van mreže |
Upozorenje o isteku sertifikata
Control Hub šalje upozorenja o isteku sertifikata korisnicima 67 dana pre datuma isteka, a zatim svakih 12 dana, dok se sertifikat ne obnovi.
- Sertifikati u vlasništvu i kojima upravljaju kupci - Proaktivno upozorenje se šalje iz Control Hub-a, a vi ste odgovorni za obnavljanje i upravljanje sertifikatom.
- Cisco u vlasništvu i upravlja sertifikatima - Proaktivno upozorenje se šalje iz Control Hub-a, a mi smo odgovorni za obnavljanje i upravljanje sertifikatom.
Podesite proaktivno upozorenje da biste primili obaveštenje kada sertifikat istekne.
Definicije alarma statusa aplikacije Control Hub
Za listu dostupnih definicija alarma za namensku instancu, pogledajte definicije alarma statusa aplikacije Control Hub.
Možete podesiti URL za povratni poziv vebhook-a tako da se upozorenja prikazuju u aplikacijama nezavisnih proizvođača. Administrator može da odredi URL za povratni poziv vebhook-a u Control Hub-u. Nakon pružanja URL-a za povratni poziv, možete odabrati opciju vebhook kao dodatni kanal isporuke u pravilima za nova ili postojeća upozorenja. Pogledajte dole za korake o tome kako konfigurisati vebhookove.
Evo primera kako izgleda JSON element za vebhook upozorenja:
{
"orgId": "1ab23cde-4567-890f-1234-gh56ijk07l891",
"title": "title",
"summary" : "notification for a test alert",
"actionUrl" : "www.actionURL.com",
"severity" : "HIGH",
"eventType" : "created",
"resourceType": "ControlHubAlerts",
"type": "Meeting",
"subtype": "Live Meeting Monitoring",
}
Podesite URL adresu za povratni poziv vebhook-a
Prvo morate da dodate URL za povratni poziv pre nego što omogućite pravila za korišćenje vebhookova.
| 1 |
Prijavite se u Control Hub i idite na Organization Settings. |
| 2 |
Dođite do odeljka za konfiguraciju Vebhook-a . |
| 3 |
Uključite prekidač Konfiguriši URL vebhook-a . Pojavljuje se pop-up prozor. |
| 4 |
Unesite URL adresu vebhook-a koju želite da koristite. Takođe možete da izaberete da dodate tajni token za vebhook. Pogledajte ovaj blog da biste saznali više o tajnim tokenima.  |
| 5 |
Izaberite Potvrdi. Ako validacija ne uspe, proverite da li su vebhook URL i tajni token tačni. Kliknite na dugme Pokušajte ponovo kada završite sa proverom. |
| 6 |
Izaberite Sačuvaj. |
Omogućite vebhook u pravilu
Nakon postavljanja URL-a vebhook-a, možete podesiti pravila za korišćenje vebhook-ova kao kanala za isporuku.
| 1 |
Prijavite se na Control Hub i idite na . |
| 2 |
Na kartici Sva pravila izaberite pravilo. |
| 3 |
U Način isporuke sekcija, proverite Vebhook polje za potvrdu. Na osnovu vrste upozorenja koje kreirate, prikazan je primer korisnog tereta tako da možete znati šta da očekujete. 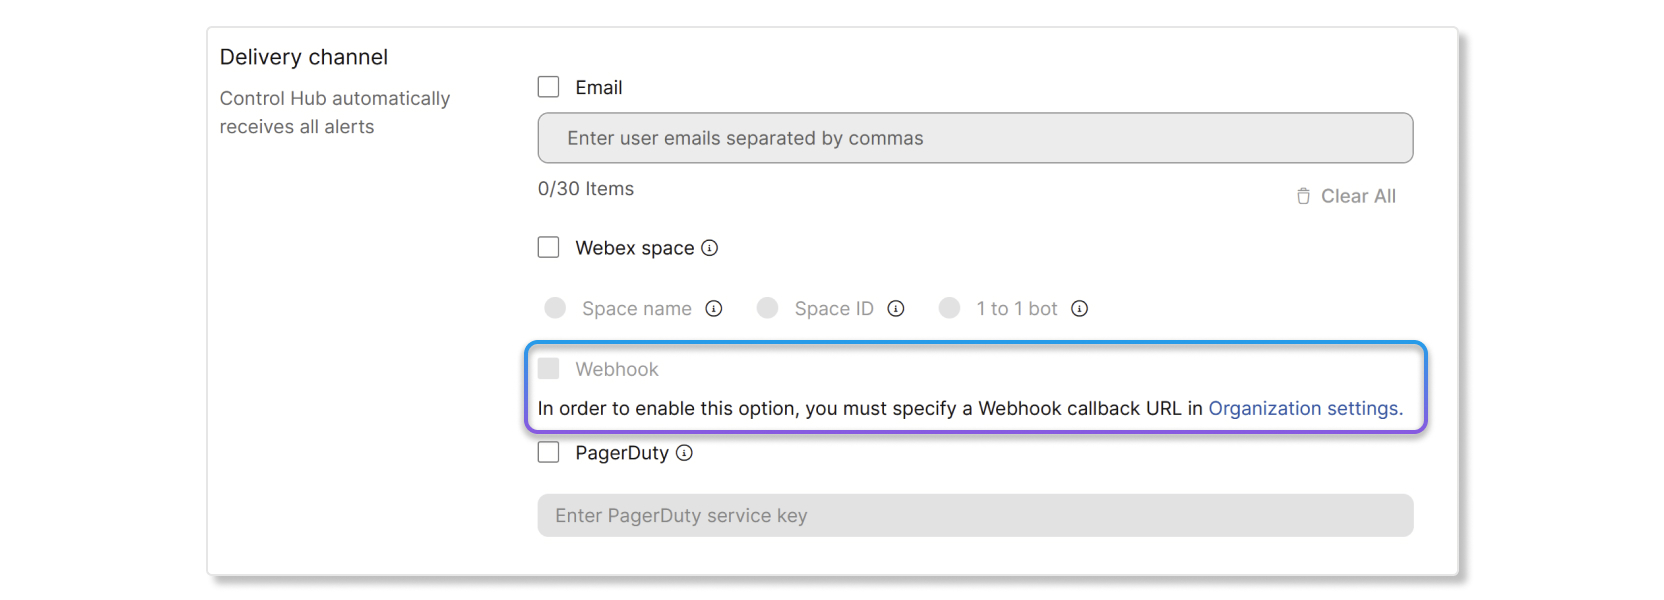 |
| 4 |
Kliknite na Sačuvaj. |
Cisco uređaji vebhook terenska referenca
Za informacije o referencama vebhook polja za Cisco uređaje, pogledajte ovaj članak.
Možete podesiti ključ za integraciju PagerDuti-a tako da se upozorenja pojavljuju u aplikacijama trećih strana.
Omogućite PagerDuti u pravilu
Pre nego što počnete
Prvo morate dobiti ključ za integraciju u PagerDuti pre nego što omogućite postavku PagerDuti za upozorenja u Control Hub-u. Da biste dobili ključ za integraciju, kreirajte novu uslugu u PagerDuti i izaberite Events API VKSNUMKS kao integraciju. Kada kreirate uslugu Events API V2, ključ za integraciju možete pronaći na kartici Integracije na kontrolnoj tabli PagerDuti.
| 1 |
Prijavite se na Control Hub i idite na . |
| 2 |
U odeljku Kanal isporuke, označite polje za potvrdu PagerDuti . |
| 3 |
Unesite ključ za integraciju koji ste kreirali na kontrolnoj tabli PagerDuti. |
| 4 |
Kliknite na Sačuvaj. |


